Violet is a genus comprising over 500 subspecies. It naturally grows in the mountainous regions of the Northern Hemisphere, but also thrives as a houseplant.
The flower grows quickly and requires periodic repotting. Saintpaulias (also known as African violets), which belong to a different family, are often confused with violets. The tips below apply to both.

Transplanting violets at home
At home, repot the plant annually. Over the next 12 months, the soil becomes severely depleted, losing most of its nutrients. The soil compacts and absorbs moisture poorly, or it leads to stagnant water. Under these conditions, the plant quickly begins to rot or dry out. If the Saintpaulia grows rapidly, its root system can completely fill the container, which can also damage the plant: the leaves become small, darken, and stretch out. To prevent weakening, it is necessary to repot the plant.
Experts note that annually replacing the container also helps ensure continuous flowering. The plant will receive sufficient nutrients to produce new blooms.

Determining the need to replant a violet
The condition of the flower itself can easily indicate that repotting is necessary. The following signs indicate this:
- the appearance of a white coating on the soil surface;
- the root system grows to such a state that it envelops the entire container;
- change in color of leaf blades from green to brown;
- reduction in foliage size or loss of foliage;
- excessive extension of the trunk;
- compaction of soil in a container.
Sometimes a prolonged absence of flowering signals the need to change the pot. However, violets can also produce buds during illness or when undernourished. If flowering has begun and the soil needs urgent replacement, the buds and open flowers should be pruned.
Experienced gardeners recommend not waiting for the first signs of a houseplant's demise, but repotting it annually according to a schedule. This will ensure the violet remains healthy.
Timing of replanting indoor violets
The pot should be changed in the spring, in April or May. This procedure can also be done in late February, early March, or throughout the fall. At these times, the air temperature is optimal and daylight hours are sufficiently long. Disturbing the plant in the summer is strictly prohibited. In conditions of intense heat and low soil and air humidity, the violet may not thrive and may die.
Winter repotting is permitted, but only with the use of phytolamps. These should extend daylight hours, especially in December. Insufficient light will cause the plant to thrive just as poorly as in warmer temperatures. In February, supplemental lighting is practically no longer necessary unless the grower lives in northern regions.
The plant should not be repotted during flowering. If buds appear on the rosette, this indicates sufficient nutrient levels in the soil. It is necessary to wait until the flowering period has passed and then change the pot. An exception is made if the Saintpaulia is affected by a fungal or bacterial disease or pests. In this case, carefully remove the plant from the pot, being careful not to damage the root system, remove the inflorescences and buds, and then carefully place it in a new container without removing the old root ball. This method is called the transshipment method.
Transplanting violets according to the lunar calendar
The Earth's moon significantly influences plant development. Depending on its phase, the moon can increase or decrease the circulation of sap within the plant. Experienced gardeners use the lunar calendar to increase their chances of successful planting. It's best to replace the root ball during the waning moon phase.
| Moon phase | Necessary actions |
| Growing | Change the soil and container, monitor root development. Water more frequently, and fertilize regularly. |
| Waning | Replant, paying particular attention to organic fertilizers. Limit watering. |
| New Moon/Full Moon | Don't repot the plant. It may not take root well and die. |
Transplantation methods
There are three ways to repot a Saintpaulia. The first and most popular is to change the container and partially replace the soil. This procedure is performed routinely if the violet is completely healthy and not blooming. Here's the procedure:
- Prepare a pot of slightly larger diameter.
- Fill the bottom of the container with drainage material, then add the soil mixture.
- Make a recess for the root system.
- Carefully remove the violet from the old pot, shake off the soil, which will easily come off on its own.
- Place the flower in a new pot, surrounding the roots with new soil.
This method minimizes damage to the plant's lower part, making repotting as gentle as possible. More than 50% of the soil is replaced, providing a supply of new nutrients and improving the health of the indoor violet.
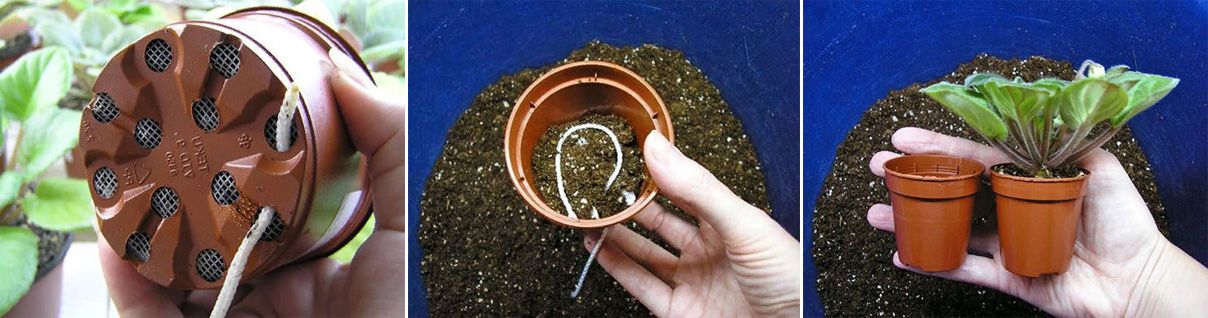
The second method involves a complete soil change. This should be used if the soil is seriously depleted. A white coating on the surface, browning of the leaves, and exposed trunks indicate the need for a complete soil change. This option is damaging to the roots, but it allows for maximum nutrient supply. Here's how to perform the procedure correctly:
- Remove the plant from the soil. Remove all soil, including any rotted or dried roots.
- Carefully trim off any leaves that are too large, dry, excessively soft, or brown. Sprinkle the cut areas with crushed charcoal or ash.
- Prepare a new container: fill it with drainage, then half of the soil mixture.
- Place the violet in a new container, surround it with soil, and compact it lightly. Add the remaining half of the mixture until it almost reaches the lower leaves.
- Tap the pot lightly to distribute the soil evenly.
- After 24 hours, water the Saintpaulia generously at the roots, adding a little more soil if necessary.
The third option is used if the plant is in bloom but urgently requires repotting. The root ball is preserved, but the container is replaced with a larger one. Here's how to repot it step by step:
- Moisten the soil in the old pot, being careful not to touch the leaves with moisture, and carefully pull it out completely.
- Add drainage material to the new container, which should be larger in diameter than the old one. Then place the previous pot on top and fill the space between the two containers with soil.
- Place a lump of earth with the violet root system into the resulting hole.
- Check if the ground level is the same.
Capacity requirements
Violets don't need deep pots. Their root system expands upward, so the maximum container depth is 10 cm. As for the diameter, depending on the age and size of the flower, a container 5-9 cm in diameter is recommended. For miniature varieties, a container 5 cm deep and 4 cm in diameter is sufficient.
Particular attention should be paid to the container material. The most common options are:
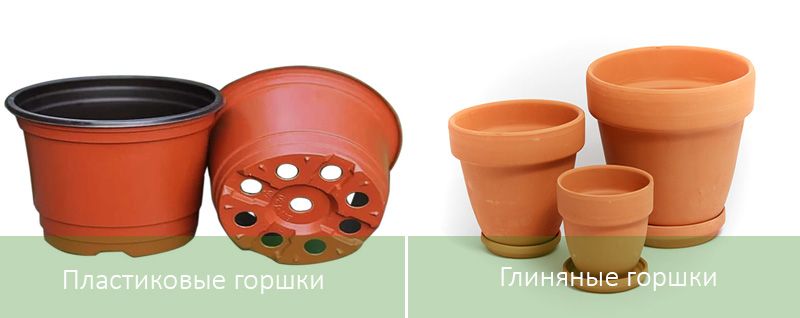
- Plastic. An inexpensive and easy-to-use material. Its light weight allows pots to be placed on glass shelves or fragile windowsills. Stores offer a wide variety of shapes, colors, patterns, and textures. The only drawback is the lack of ventilation. If the manufacturer doesn't provide air and drainage holes in the container, you should make them using a very hot nail. It's best to purchase a special container for violets; these models feature a convenient drainage system.
- Clay. Clay pots are quite heavy and bulky, so they're not suitable for fragile planters and glass shelves. On the other hand, they retain heat well, retain water at the roots, and allow adequate airflow. This type of pot is a good choice for those with an unlimited budget.
It's convenient if the container is transparent. The owner can monitor the size of the root system and repot it promptly.
Composition of the nutrient substrate
A special soil mixture for violets is available at flower shops. It contains essential minerals and biohumates. Sometimes, a homemade soil mix is prepared using the following ingredients:
- leaf soil;
- peat;
- coniferous soil;
- turf soil;
- river sand.
The required proportions are 2:1:1:1:1. To improve drainage, it is better to add a handful of crushed or fine charcoal.
The soil should be treated to remove fungus, bacteria, and pest larvae. The best option is to bake it in the oven for 20-30 minutes at 200°C. If using an oven is not convenient, you should treat the soil with boiling water.
Violet transplantation technology
Before repotting, several preparatory steps are necessary. New containers should be treated to reduce the risk of disease. You can wet the inside with a potassium permanganate solution and rinse it off after a few hours. Clay containers should also be cleaned of any salt deposits. Soak them in water for 10-12 hours. You should also purchase drainage. Expanded clay or pieces of medium-grain charcoal can serve this purpose.
When repotting, remove large leaves that can absorb nutrients. These leaves are suitable for vegetative propagation.
Top.tomathouse.com warns: mistakes when transplanting violets
A violet can die if repotted incorrectly. Gardeners often make the following mistakes:
- transplanting into a pot with a diameter of more than 9 cm;
- watering after planting in the center of the rosette;
- too deep or too shallow placement (leads to root rot and weakening of the rosette, respectively);
- use of unsterilized soil contaminated with fungal spores or bacteria;
- incorrect selection of substrate components;
- application of soil mixture with excess nutrients.
The repotting procedure is simple, and even a novice gardener can follow it correctly. The key is to find the right time to change the container and remember to provide the right nutrient substrate.