Kerria is a perennial shrub belonging to the Rosaceae family. It is native to Japan and southwest China. It prefers mountainous terrain and forests. In Russia, it is often used to decorate parks, alleys, gardens, squares, and other areas. When planting shrubs in a garden, it is important to select varieties based on the climate of the region.
Description of the kerria shrub
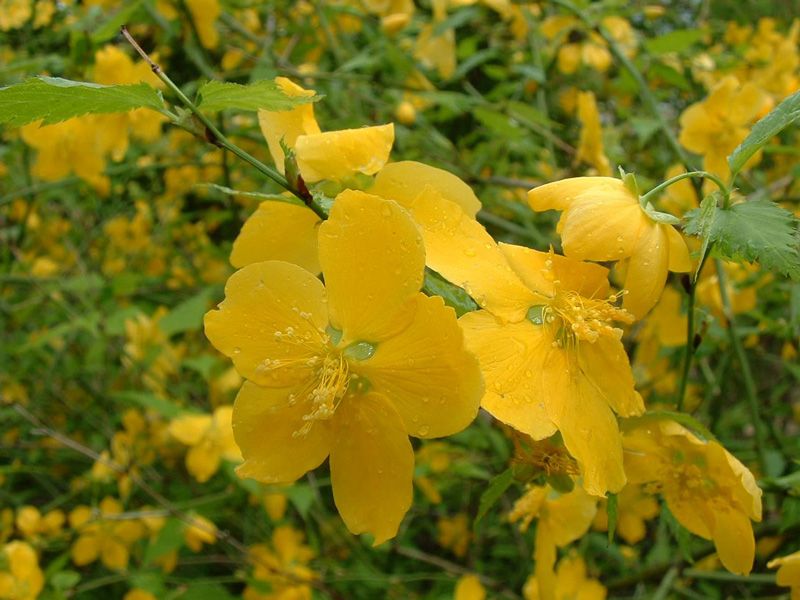
The shrub is named after the first botanist in Ceylon and a collector of flora, W. Kerr. Kerria is popularly known as the Easter Rose. This stems from the fact that it begins blooming on one of the most important religious holidays, and its flowers resemble rosebuds.
The bush grows very quickly, reaching a height of 3 m. Its stems resemble green twigs. The leaves are lanceolate, toothed, and pointed at the tip. They reach a length of up to 10 cm. The outer surface of the leaf blade is smooth, while the underside is pubescent. During the growing season, the foliage is pale emerald, turning yellow in the fall.
The buds exude a pungent aroma (similar to dandelions), are borne solitarily, and reach 4.5 cm in circumference. Petals can be single or double. Blooms begin in May. The flower life cycle is 25-35 days. Under the right conditions, bud formation can be observed again in the fall.
After flowering, a dark brown drupe appears. In central Russia, the shrub generally does not produce fruit.
A distinct advantage of this plant is its tolerance of polluted air. Therefore, it can be planted near highways, factories, and other areas with high air pollution.
Types and varieties of Kerria japonica
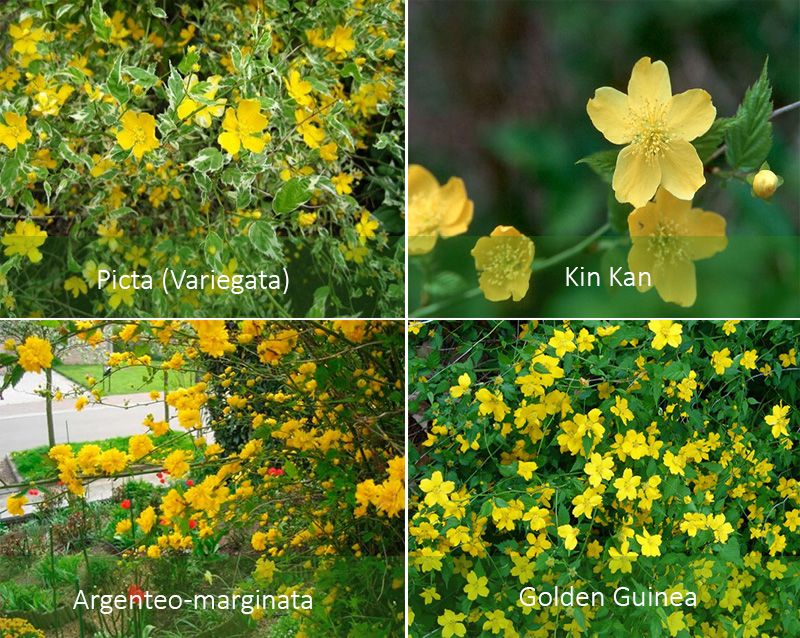
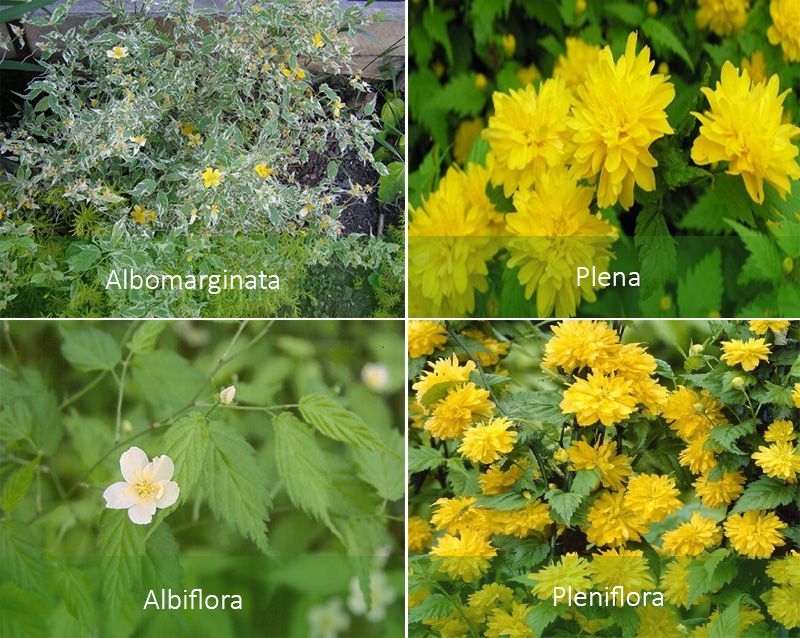
The shrub has only one variety—Kerria japonica. Its most popular forms, grown in Russia, are:
| Name | Description | Leaves |
| Picta (Variegata) | Up to 1 m. With yellow flowers. | Variegated, with whitish-beige spots and borders on the surface. |
| Albomarginata | A distinctive feature is slow growth. | Asymmetrical, with snow-white edging. |
| Argenteo-marginata | Up to 2 m. With canary buds. | The perimeter is framed by a line thinner than the previous variety. |
| Plena (buttercup bush) | It produces numerous root suckers. Because of this, it is often used to create hedges. | They look like raspberry leaves. |
| Pleniflora | With double flowers of golden color, reminiscent of pom-poms. | |
| Golden Guinea | Blooms profusely. The buds are simple, regular, with dark lemon petals. | Light green, form a conical crown. |
| Kin Kan | With many decorative flowers. | |
| Albiflora | With white petals. |
Planting Kerria japonica in open ground
You can plant seedlings directly in the open ground or grow them in containers first. In the first case, plant in the spring, after the soil has warmed, or in October before frost. Seedlings grown indoors can be transplanted any month except winter.
The location should be sunny and protected from drafts. However, ultraviolet rays can burn the foliage. Therefore, the bushes need some shade at midday. Ideally, they should be planted near fruit trees, whose crowns will protect the foliage from scorching. Planting in the shade is undesirable, as this will prevent lush flowering.
Step by step planting process:
- In moist, loamy, humus, nutritious soil, dig a hole 0.4 m deep.
- Pour a mixture of humus and turf onto the bottom, add 6-8 spoons of complex mineral fertilizer (to form a small mound).
- Place the bush in the center of the mound, spreading out the rhizome.
- Fill the voids with substrate. The root collar should be level with the soil surface.
- Compact the soil slightly and water.
Caring for Kerria in the Garden
After planting, the shrub requires proper care. Only then will it remain disease-free and become a beautiful addition to the garden.
Watering, fertilizing, pruning
Kerria requires daily watering only for the first 2-3 weeks after planting. Use settled, warm, and soft water. After that, natural rainfall will be sufficient. However, during dry weather and during bud formation, regular watering is necessary. The top layer of soil (approximately 10 cm) should not dry out. This is necessary for better flowering, new shoot growth, and protection from high temperatures.
To ensure proper soil moisture retention, mulching is recommended, for example with fallen leaves. During excessively rainy weather, it's important to regularly loosen the soil and weed to prevent water stagnation.
Pruning should be done frequently because the shrub grows rapidly. In March, remove branches that have frozen, dried out, or broken over the winter. Shorten young shoots by 1/4. Prune the branches a second time after the first flowering, removing old shoots as you go. A third trimming should be done in late July-August to promote more abundant bud formation.
To create a decorative effect, overly long shoots should be trimmed to a uniform length. Young shoots should be left untouched. The bush should also be thinned periodically. This will make the bush more compact, yet still lush.
The plant should be fertilized for the first time in the spring, immediately after pruning. Use organic fertilizer (preferably mullein diluted with water at a ratio of 1:10). After 1.5-2 weeks, you can add wood ash (100-200 g per square meter) and compost (1:10). After the first flowering, watering with complex mineral mixtures is recommended.
Post-flowering care
Kerrias grown in nurseries in our country typically tolerate Russian frosts well. However, winter hardiness should be verified for each individual plant.
When planting in southern Russia, there's no need for shelter. If the plant is grown in a temperate climate with cold winters, the bush should be mulched with spruce branches or dried leaves to prevent freezing, and then covered with a waterproof material. This should be done when the temperature drops to -10°C, remembering to leave openings for air circulation. If the bush gets wet, rots, or meltwater stagnates, it will rot and die.
In spring, the covering is removed gradually to allow the plant time to acclimate to the surrounding atmosphere. First, remove the film, then reduce the mulch height to 15 cm, and only then expose the bush completely.
Methods of reproduction
The simplest method is division of cuttings. This is done as follows:
- In summer, dig small trenches (5-7 cm deep) near the mother bush.
- Press flexible branches to the ground.
- Secure them with brackets.
- After the leaves appear (after about 3-4 weeks), fill the trench with substrate, leaving only the ends of the branches on the surface.
- The root system will begin to develop in the fall. In the spring, separate the grown shoot.
Step-by-step propagation by cuttings:
- In early April, separate the woody shoots, and in July, the green ones. The cuttings should have at least a couple of buds formed.
- Plant in a cool, shady spot in the greenhouse.
- It takes a long time for the root system to develop, so it is best to leave the young bushes in a greenhouse for the winter.
- In May, transplant the cuttings into containers and bring them into a warm room.
- Next season, transplant it outside.
In the fall, kerria is propagated by suckers. The suckers are separated from the mother plant and planted separately. When the necessary conditions for development are created, the root system quickly adapts, and the young bushes grow into full-fledged adult plants.
When replanting, you can divide the bush. This is another way to propagate kerria. When transplanting, clear the rhizome of soil and carefully divide it into several pieces. Each piece should have well-developed roots and strong stems. Plant the divisions in the same way as the initial planting. Water the young bushes generously.
Diseases and pests
Kerria is one of the most robust ornamental foliage plants. When maintained in the right conditions, it is rarely affected by insect pests or various infections.
In rare cases, spider mites may infest seedlings. This occurs due to care errors, such as dry air, dust and dirt on the foliage, or dry leaves in adjacent pots. Insecticides, such as Fitoverm, Fufanon, and others, can kill the pest. To prevent infestations, it's recommended to install a humidifier in the room, wipe the plants with a damp cloth, and promptly remove fallen leaves.
Top.tomathouse.com informs: how to grow kerria in the Moscow region
When planting in the central region, special conditions must be observed. These same conditions also apply to the Leningrad Region. These requirements are due to the climate.
In late fall, during dry weather, lay foam around the base. Cover with pine branches or dry leaves to keep the shoots slightly pressed to the ground. To prevent them from straightening, construct a frame. It's important to keep the shelter well ventilated, so leave holes for air circulation.
In early spring, during cloudy but dry weather, remove the structure. First, remove the frame, then clear away any branches and leaves. Bright sun can damage the kerria, so it should be protected with a covering material for the first few days. This can be purchased at a gardening store. Burnt shoots can be pruned, but this will disrupt the flowering process.
When properly planted and cared for, kerria begins to form buds earlier than other trees. Its blooms are colorful and abundant, and the shrub will enhance any landscape design. Maintaining it in Russian gardens is easy; just water it regularly, prune it, and fertilize it. If done correctly, it is resistant to diseases and pests.