A greenhouse is indispensable at the dacha, as it protects plants from inclement weather and promotes vigorous growth. Plastic bottles are an excellent alternative to expensive components, equally reliable.
Pros and cons of plastic bottles as a greenhouse material
As a raw material for greenhouse construction, plastic bottles have a number of advantages over other materials: film, glass or wood.
- Durability. Provides a high level of reliability for the greenhouse frame. This lightweight material won't tear or fade in bright sunlight or break under the weight of snow. Unlike a layer of glass, a bottle is much stronger and won't break or burst in severe frost.
- Using different colors makes it possible to control where shade is needed. For example, using green or brown colors can create comfortable conditions for shade-loving seedlings. Transparent (colorless) colors provide bright light while scattering ultraviolet rays, thereby protecting plants from their harmful effects.
- Excellent thermal insulation. The structure of plastic allows it to retain heat without blocking oxygen, and the air gap in the bottle provides superior heat retention. In cold climates, two rows of containers are used to protect seedlings from frost and drafts.
- Inexpensive. Compared to other materials used in greenhouse construction, plastic bottles are significantly less expensive. You don't have to buy them; just be patient and start harvesting them in the fall. Plastic doesn't harm plants or soil; it's a relatively environmentally friendly material that can replace metal and wood covered with polyethylene film. A greenhouse made from this material won't rot or rust, and will serve its intended purpose for a long time.
- Working with plastic containers is very simple and safe; even a child can do the job. No special skills or abilities are required, just enthusiasm and a willing spirit. Furthermore, plastic is lightweight, so construction won't require much effort.
However, there's one drawback that discourages gardeners from pursuing this idea. To construct a durable, long-lasting greenhouse, 600-2,000 plastic bottles are needed. However, this is more a matter of time and patience; once you've accumulated the required amount of materials, the rest of the construction is straightforward.
Necessary tools
When building a greenhouse, from measuring the site to installing the frame and assembling the main part, it is necessary to prepare special tools in advance:
- construction awl;
- cutter;
- hacksaw for wood and metal;
- hammer;
- nails of various sizes;
- nylon thread and copper wire;
- tape measure and measuring tape;
- level;
- pencil, paper, ruler;
- plastic bottles;
- wooden beams;
- mounting rail.
At various stages of construction, the need for certain tools will arise, so it is important to organize the workspace well.
When building, wear protective gloves to avoid damaging your hands. It's also advisable to wear protective overalls and goggles when working with wood to prevent sawdust from getting into your eyes and on your clothes. Also, always keep a first aid kit on hand in case of emergency.
Preparing plastic bottles
Before starting greenhouse construction, the materials must be prepared. This requires several steps:
- To begin, the bottles need to be sorted by specific parameters, such as color and capacity. It's not necessary to separate the plastic into green, brown, and clear; sorting by colored or colorless is sufficient. The volume must be precise to avoid any problems during assembly.
- Each container should be cleaned, removing labels and adhesive. To do this, place them in water and leave them there for 2-3 days. This disinfects the containers and makes any adhesive residue easier to remove.
- After cleaning, they should be exposed to the open air for several days. This is to ensure that any unpleasant or chemical odors have dissipated.
This process is time-consuming, as each of the 2,000 containers must be carefully processed. Therefore, it is carried out gradually, as the necessary materials are acquired. Once the plastic blanks are prepared, construction can begin.
Choosing a location
The best location for a plastic bottle greenhouse is a south or southwest-facing plot, depending on the development and the placement of the beds. Shaded areas near buildings and fences should be avoided; it's important that the greenhouse has direct sunlight.
Plastic effectively diffuses ultraviolet radiation, so there's no need for additional shading. Pay attention to wind direction, as an unstable foundation can tip over during strong gusts and hurricanes. It's best to keep the structure protected from wind. If the greenhouse is located outdoors, consider only placing the beds inside and reinforcing the foundation with available materials, such as tires or concrete. In particularly rainy regions, site selection should be especially careful. It's important to ensure the foundation doesn't wash out and the wood used for the frame doesn't rot, otherwise the greenhouse could collapse, killing the seedlings.
In this case, it is necessary to place the building on a natural or artificial elevation, covering the foundation with pebbles or crushed stone.
Avoid constructing a greenhouse too close to flowerbeds and garden beds to avoid damaging the plants' root systems. Once the location has been determined, the land must be prepared. This involves leveling the soil and clearing the area of debris, weeds, and residual root systems. Any rocks in the soil should also be removed, ensuring the soil is soft and loose. Once the site has been prepared, you can begin marking out the area.
Types of greenhouses and walls made from bottles
Bottle greenhouses are divided into just four types, differing not only in their external characteristics (shape and size), but also in the methods used for the material. Depending on the chosen type, construction time and effort will vary, as will the number of containers required and the quality of their pre-treatment. Each type has its own advantages and disadvantages, and is used based on the gardener's needs.
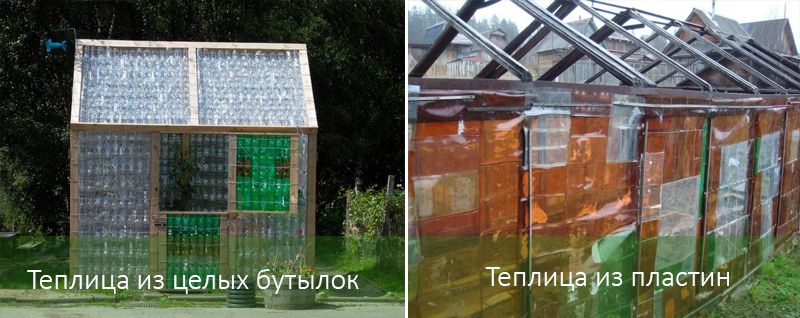
From whole bottles
This method is the most popular due to its simplicity and practicality. Preparing the materials and carrying out the necessary work doesn't require much time or effort. The finished greenhouse also has a distinctive appearance, making it a striking addition to any property.
To construct it, you need to follow the step-by-step instructions:
- First, remove the bottom of the cleaned bottles so that the cut is approximately at the curve. This way, the diameter of the resulting hole will be slightly smaller than the diameter of the container's center.
- Maximum strength is achieved by threading the finished plastic material onto each other. Carefully press the top of one bottle into the cut bottom of the other. It's important to ensure the containers don't slip and are held firmly.
- The frame must be prepared in advance. Wood is the best material for it, as it is lightweight and strong. Two rows of elastic threads must be stretched across the frame at a distance equal to the approximate width of the bottles.
- Then, carefully place dense tubes made from plastic bottles joined together between the threads. Make sure there are no gaps between them and that they fit tightly against the walls of the frame, otherwise the structure will be unstable.
- For added security after installation, plastic pipes should be carefully secured with tape, electrical tape, or wrapped in thick adhesive paper. If done correctly, the structure will withstand any weather, even heavy snowfalls and blizzards in winter. Dismantling the frame when cold weather sets in is unnecessary.
- A structure of this type will function for at least 10 years, after which it will need to be updated by replacing the tape and damaged plastic bottles.
For this type of project, solid 1.5-2 liter containers are used. All bottles must be the same size. The minimum quantity of materials required is 400, with no upper limit. During construction, it is not recommended to use unreliable tools, which will only shorten the lifespan of the greenhouse. For example, do not use staplers to fasten the containers together, as strong winds will cause the plastic to tear and the structure to collapse.
Fishing line will also negatively impact the frame's stability, fraying after 5-6 years due to exposure to sunlight. Ordinary thread can rot, which is dangerous not only for the longevity of the structure but also for the plants.
From bottle plates
This method is more complex and requires more dedication, but the results are worth the effort. The greenhouse is as robust and structurally sound as wooden or metal structures, and its appearance resembles a glass greenhouse.
- First, the bottle needs to be cut off at both ends, removing the neck and bottom. The resulting piece should have an elongated rectangular shape.
- To prevent the plastic from curling, the sheets must be carefully smoothed out with an iron, using thick paper.
- The aligned pieces should have dimensions of 17x32 cm, after which they can be sewn together with metal wire.
- The plastic sheets must be placed on top of each other so that there is no space between them.
- The finished plates must be secured to the frame with nails.
Greenhouse for tomatoes and cucumbers
The basic design principle of this type is to alternate bottles with colored and transparent plastic, resulting in a semi-darkening effect that is beneficial for the growth of cucumbers and tomatoes.
- First, you need to select a suitable rail so that it corresponds to the height of the entire structure.
- Plastic sheets, pre-fabricated from bottles, are attached to the slats using a furniture tacker. It's important that the pieces are all the same size.
- On the inside, you can also place a film for greater reliability and insulation.
Mini greenhouses
Making this greenhouse is very simple: simply remove the bottom of a bottle and place it over the plant. The result is a personal greenhouse. The lid can be opened as needed for ventilation.
This greenhouse can be used both outdoors and indoors for growing seedlings. To do this, split the bottle in half, make a hole in the bottom for drainage, fill it with soil, and cover it with the other half. It's recommended to choose bottles with a capacity of 3-8 liters, depending on the size of the seedlings.