Due to unpredictable weather, every gardener strives to protect their crops as much as possible. The key to securing a successful harvest is a well-built greenhouse that will last for years. Today, there are a huge variety of designs, coverings, and materials available.
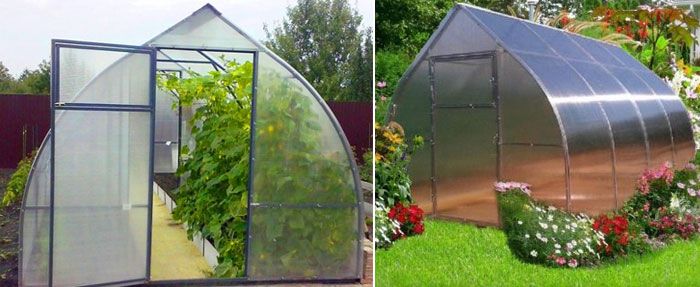
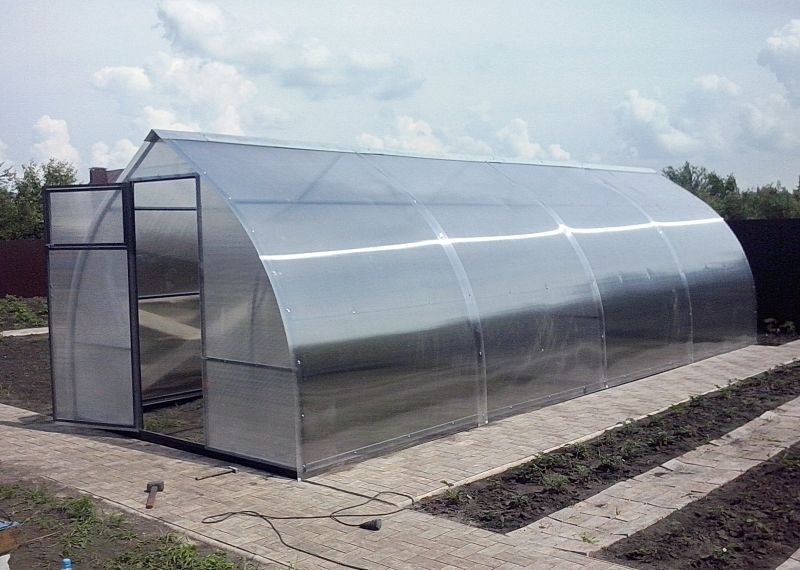
Snow, rain, gusty winds, and unstable soil conditions can reduce the lifespan of a greenhouse. Therefore, choosing one requires particular care, taking all the above-mentioned factors into account. One of the most reliable types currently available is the "Kapelka" greenhouse; thanks to its versatile shape, it's resistant to snow, wind, and quicksand.
Content
- 1 Factors Affecting the Durability of Greenhouses
- 2 Advantages and disadvantages of the "Kapelka" greenhouse
- 3 DIY installation of a purchased droplet greenhouse: step-by-step instructions
- 4 Making a Teardrop Greenhouse: Step-by-Step Instructions
- 5 Operating Instructions for a Droplet Greenhouse
- 6 Customer reviews and recommendations
- 7 Choosing a greenhouse: arched or teardrop-shaped
Factors Affecting the Durability of Greenhouses
Numerous gardening publications are full of greenhouse building ideas, and manufacturers are vying with each other to praise their products. How can you avoid making a mistake when choosing a greenhouse, while also avoiding overpaying for unnecessary components that are useless in your weather conditions? Let's explore what determines the strength of a greenhouse.
Table. Parameters determining the strength of a greenhouse
| Parameter | Description |
|
|
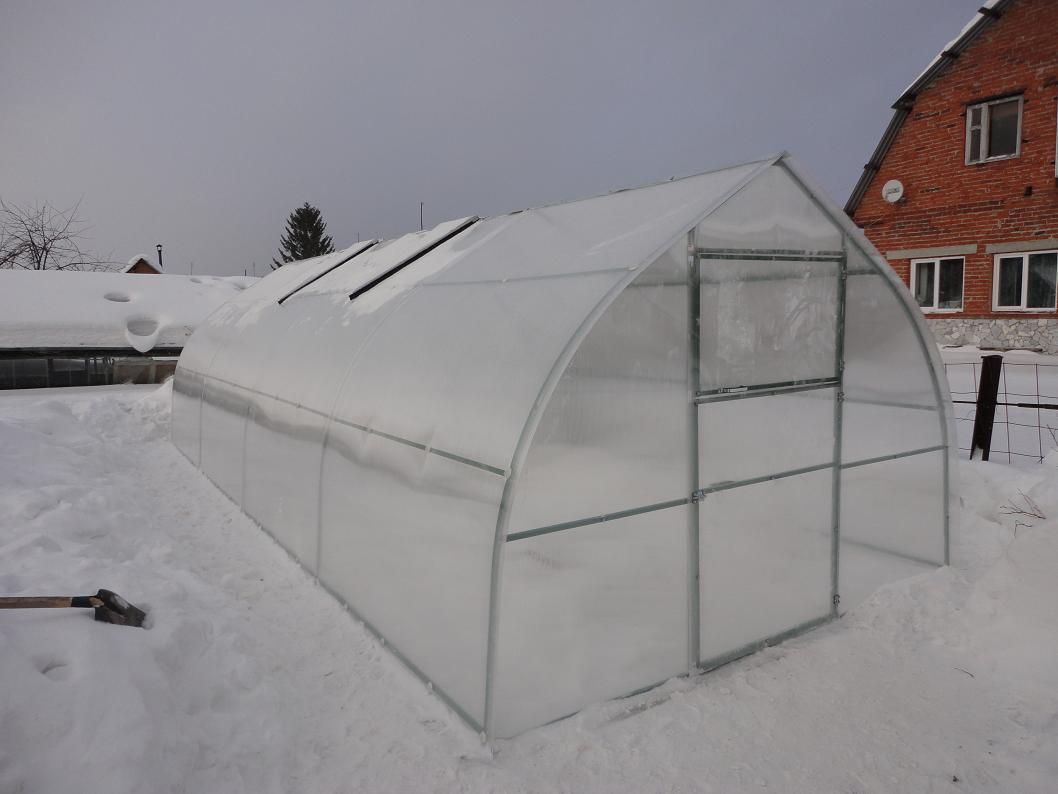
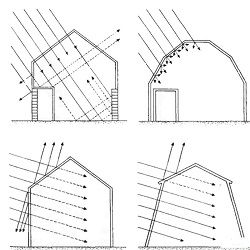
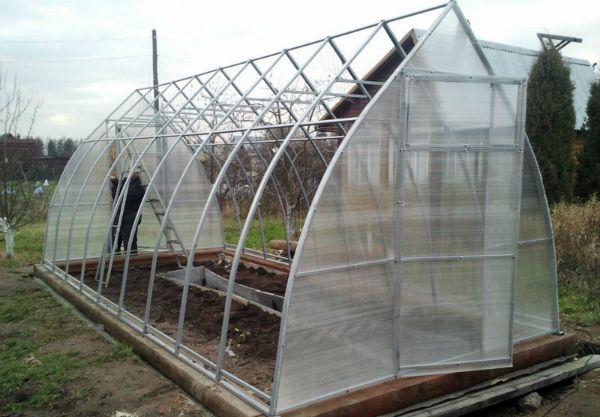
For regions with frequent snowfall, greenhouses with steep roof pitches are the most suitable, as this factor influences the speed of snow melt. Therefore, for areas where snowfall is common, it's better to choose steep, single-pitched structures or teardrop-shaped greenhouses. Classic greenhouses are only suitable if the roof slopes are at an acute angle to each other. |
|
|
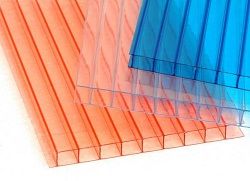
When assembling a polycarbonate greenhouse, it's essential to consider its thickness and density. Many types of this covering material are available on the market, but remember that for low-wind areas, a material thickness of 4 mm or more is suitable, while for less favorable weather regions, you should look for polycarbonate at least 6 mm thick. |
 |
If you're trying to save money or the seller claims that material less than 4 mm thick is super-strong, don't risk it. There's a good chance such a greenhouse won't last even a year. This is especially true if you don't live on the property during the winter and can't regularly clear the roof of snow. |
|
|
Various manufacturers offer a wide range of frame types. Frames can be collapsible or monolithic, reinforced or lightweight. You should consider the prevailing weather conditions in your region. Non-collapsible structures tend to be more expensive for gardeners, as they require additional transportation costs. We recommend purchasing a frame with additional reinforcement; the extra cost is not as significant, considering it is guaranteed to last for many seasons. |
|
|
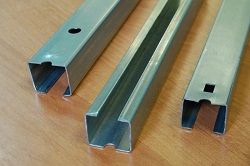
This parameter is quite simple: the denser and thicker the profile used to construct the greenhouse frame, the more reliable its structure will be. This is especially true in snowy and windy regions. |
|
|
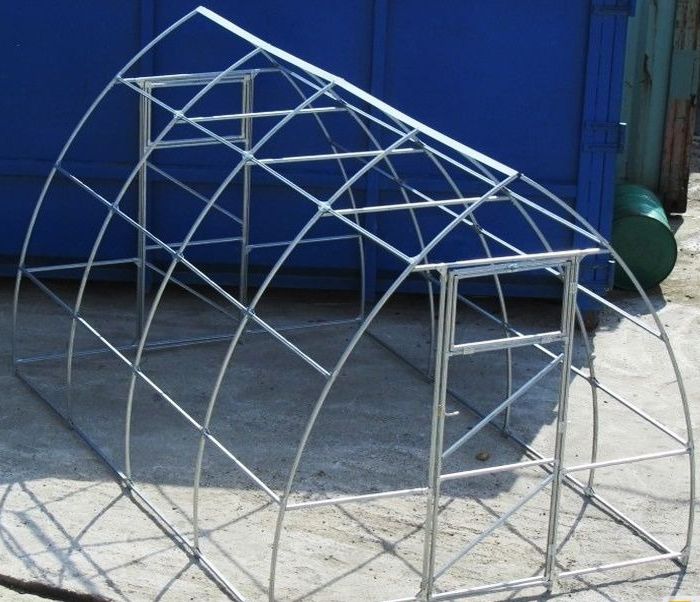
The distance between the arcs should vary between 50 and 100 cm. This will ensure the polycarbonate has sufficient support and will not crack under the weight of snow. The key is to secure the arcs together using fastening strips; typically, at least three are used. |
When planning to purchase a greenhouse, analyze the weather conditions in your region, assessing the frequency of snowfalls and winds. Carefully review all these parameters and determine which greenhouse will serve you faithfully in your garden.
Next, we'll talk about the "Kapelka" greenhouse, which, according to many gardeners, meets all the necessary requirements and allows for an excellent harvest.
Advantages and disadvantages of the "Kapelka" greenhouse
The "Kapelka" greenhouse has earned the recognition of thousands of grateful gardeners. It features a sturdy frame, reliable fastenings, an optimal shape to prevent deformation from snow, excellent light transmission, and a variety of modifications. Today, there are several leading manufacturers of this type of structure, including the brands "Apelsin," "Dom Teplits," and "Zavod Pre-fabricated Greenhouses," among others.
We offer you a list of the main advantages of the greenhouse, thanks to which it has become so popular:
- Ergonomic design. The pointed-arched structure allows snow to slide freely down the cover, while the main load is carried by the sturdy side supports. The ceiling inside the greenhouse is high enough to allow even tall people to work comfortably.
- Durable frame. The frame elements of the "Kapelka" greenhouse are made of durable galvanized steel, which most manufacturers treat with a special anti-corrosion compound, significantly increasing its lifespan. According to satisfied customers, this frame has been operating reliably for over five years, even in snowy regions.
- Secure fastening. All frame elements are securely connected with specially selected screws.
The ability to choose the optimal size. Manufacturers offer a wide range of greenhouse sizes, especially in terms of length. The design allows for the purchase of additional arches to zone the interior space. - Polycarbonate coating. Polycarbonate has long been a favorite among millions of gardeners. It is highly durable, easy to install, and has a special coating that blocks harmful UV rays while still providing good thermal insulation and light transmission.
- Attractive appearance. A greenhouse will be a great addition to any property; its unique shape can easily become a decorative feature, not just a tool for growing vegetables.
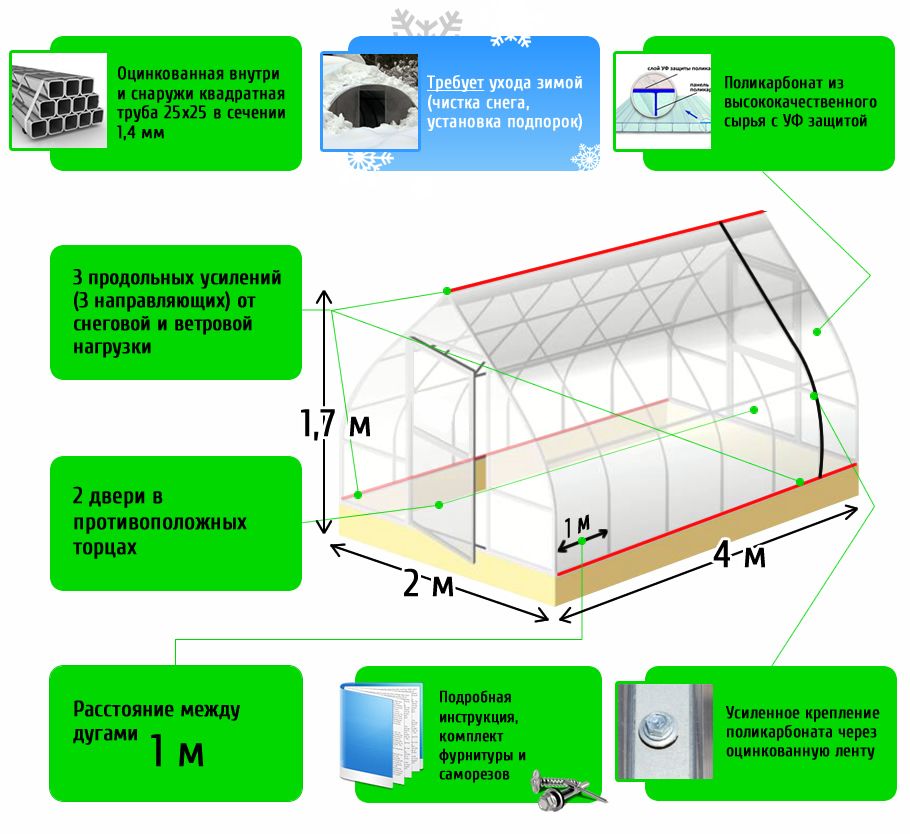
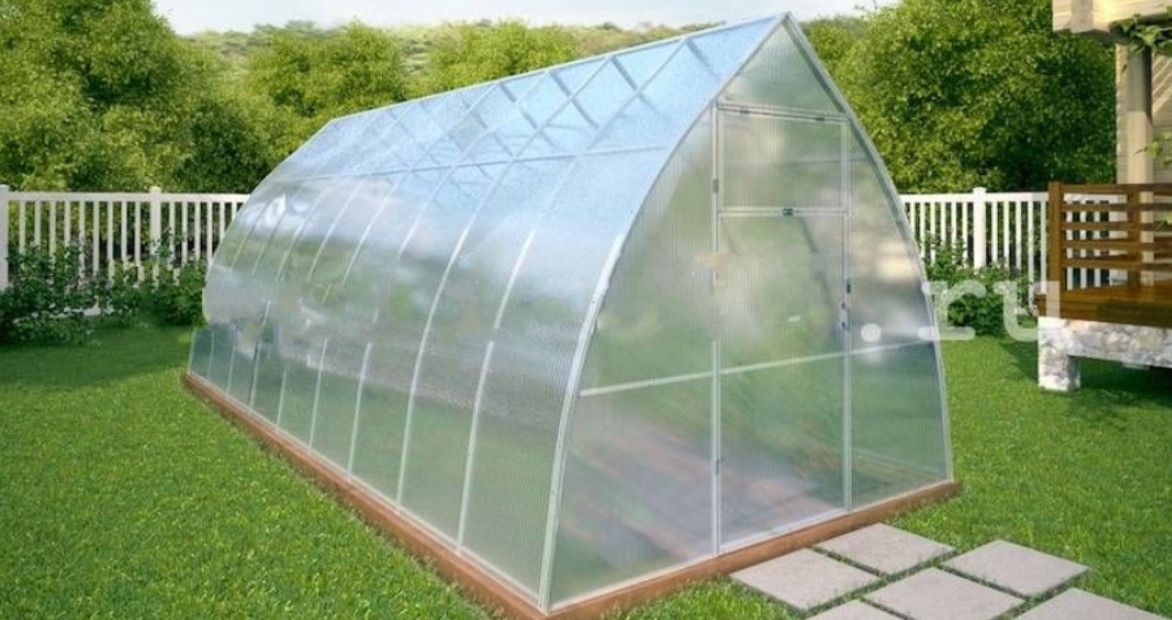
Building a teardrop greenhouse yourself is extremely difficult due to its intricate design, but you can buy one almost anywhere in the country, and detailed instructions will help you navigate the assembly process.
If the soil on your site is stable and not affected by groundwater, simply digging the frame's base 20-25 cm into the ground is sufficient. If you're concerned about the greenhouse deforming due to various factors, we suggest building a wooden frame foundation, depending on the planned size.
Manufacturers offer a variety of design sizes. However, a general trend can be identified by analyzing the available offerings:
- The most common height for a greenhouse structure is 2.3 or 2.4 meters. This is sufficient for even a tall person to feel comfortable in the greenhouse, and provides ample space for plants to grow and produce a good harvest.
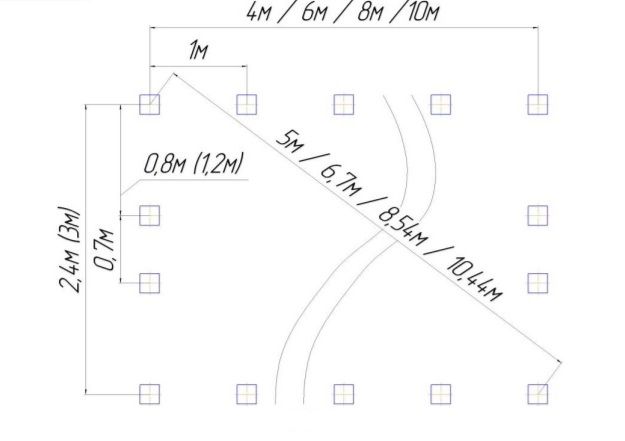
- The length of the greenhouse starts from 4 meters and can be any, but a multiple of two (4, 6, 8, 10 meters, and so on, at the customer’s request).
- The width of the greenhouse varies; you can find a 2-meter wide option, while some companies offer frames with a width of 2.4 m, 2.7 m, 3 m, or 3.7 meters.
- The distance between the arches in a drop-shaped greenhouse can range from 65 to 100 cm; the smaller the distance, the more expensive the structure will be.
- Polycarbonate may be included with the greenhouse, but is most often sold separately. You can choose the thickness of the polycarbonate sheet yourself; the recommended thickness is 60-65 mm.
- The drop-shaped greenhouse is equipped with a window and a door, one or two depending on the length of the structure.
The price of a greenhouse without delivery or covering starts at 14,500 rubles for a 4x3 meter frame and 19,900 rubles for a structure with polycarbonate included. The price depends directly on the number of arches, the distance between them, and the thickness of the polycarbonate.
Like any other invention, the droplet greenhouse has a number of disadvantages. We recommend familiarizing yourself with them before making this expensive purchase:
- The assembly process is complex. Despite the included instructions, the disassembled structure can be confusing for an inexperienced gardener. Furthermore, additional tools, such as a screwdriver, are required. Be prepared for the assembly to take several days.
- Insufficient ridge seal. Despite meticulous assembly, the seam where the slopes meet at the ridge remains less than perfectly sealed. You'll need to either use a sealant, which is purchased separately, or opt for a standard arched greenhouse if sealing is crucial for future plantings.
- Relatively high cost. Greenhouse options advertised by manufacturers typically have a minimal price to attract customers. More often than not, the design requires additional components or modifications, which increases the cost.
DIY installation of a purchased droplet greenhouse: step-by-step instructions
Click on the drawing to enlarge it.
| Stage of work | Illustration |
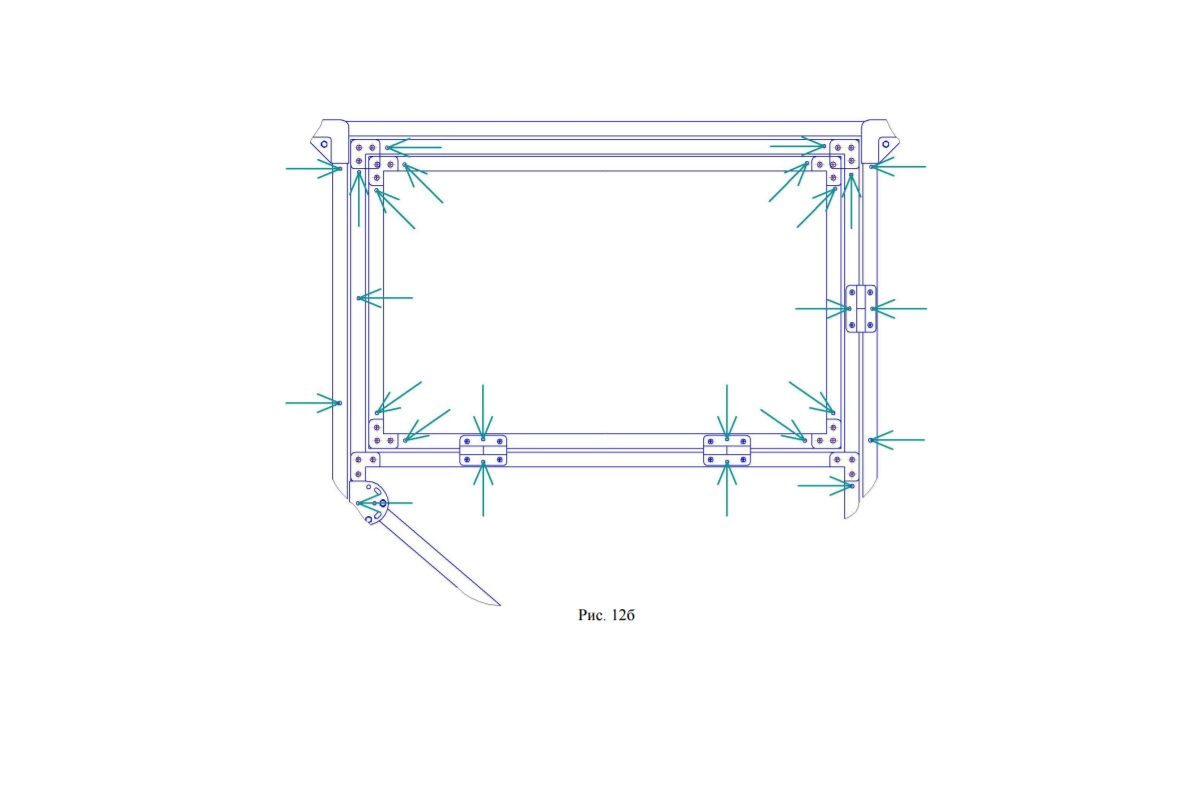
| Assembling the doors and casement windows. These are the best parts to begin assembling the structure with, to gain experience and understand the principles of fastening the profiles. At this stage, the two side door panels (13 and 13a) are fastened together using four cross profiles using a screwdriver and screws, using the holes pre-determined by the manufacturer. When installing the door, keep in mind that the left post has additional holes for the handle, and the right post will contain hinges (sometimes they are already welded in place). |
|
| The crossbars are installed so that the grooves are directed towards the ground to prevent condensation from accumulating in them. | |
| The kit includes profiles with beveled ends for structural reinforcement. Using screws and connectors, they are attached diagonally from the bottom corner to the top between the door cross members. |
|
| Assembling the window. The window kit includes four parts, numbers 7 and 17. They are connected together using screws to form a rectangle. |
|
| The classic teardrop greenhouse design involves the placement of the window in the door frame, so the assembled window is attached to the upper section of the door frame using the included hinges. |
|
| Let's move directly to the assembly of the front elements. The greenhouse frame is assembled in stages from arched gables. Two arched profiles are connected using screws and corner braces. |
|
| To strengthen the structure and prevent deformation, the manufacturer has provided an additional fastening tie - a horizontal profile that is installed between the two gables closer to the ridge where the arches connect. |
|
| To secure the frame to the ground and ensure better traction, the manufacturer has provided special elements—groove lugs—that attach to the base of the arches (3). Additionally, upright profiles (8) are attached to the upper horizontal profile, connected at the bottom by another horizontal profile (12). |
|
| To strengthen the frame, several more profiles (10,11) are attached to the front elements of the drop-shaped greenhouse parallel to the ground. |
|
| The second front part of the greenhouse is assembled in the same way, step by step, and the door is attached to it using screws and the hinges included in the kit. |
|
| Special connecting elements (8 pcs.) are attached perpendicularly to the finished frontal structure, with the help of which the remaining parts of the structure will be attached. |
|
| According to the instructions, holes are made along the entire length of the arc where the polycarbonate will be attached. |
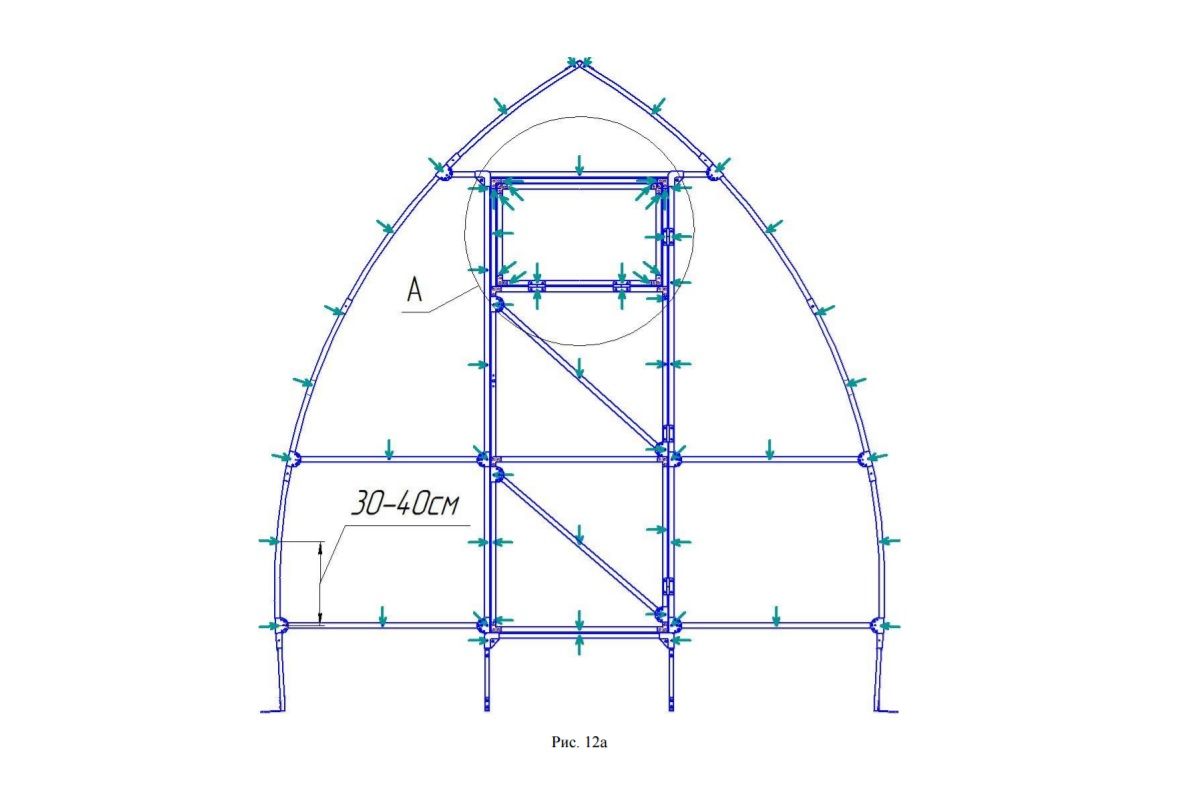
|
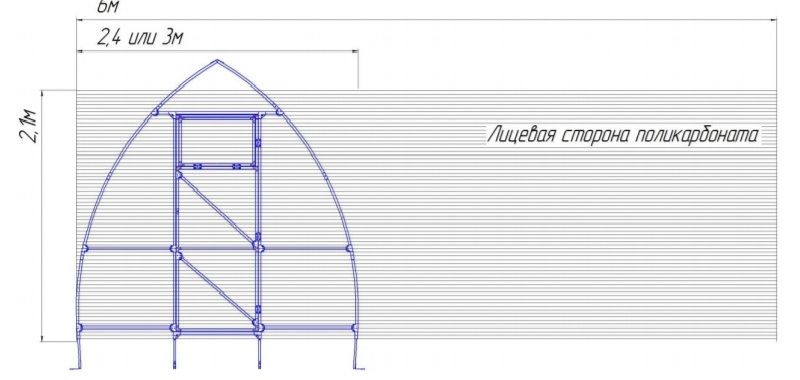
| The polycarbonate sheets are cut to size and secured using special thermal washers to prevent damage during installation. The front panel is placed on the ground with the outer surface facing up. A polycarbonate sheet is placed on top of it, with the protective film, which prevents UV penetration, facing up. Using a screwdriver, the polycarbonate is secured to the front panel, and any excess is trimmed. |
|
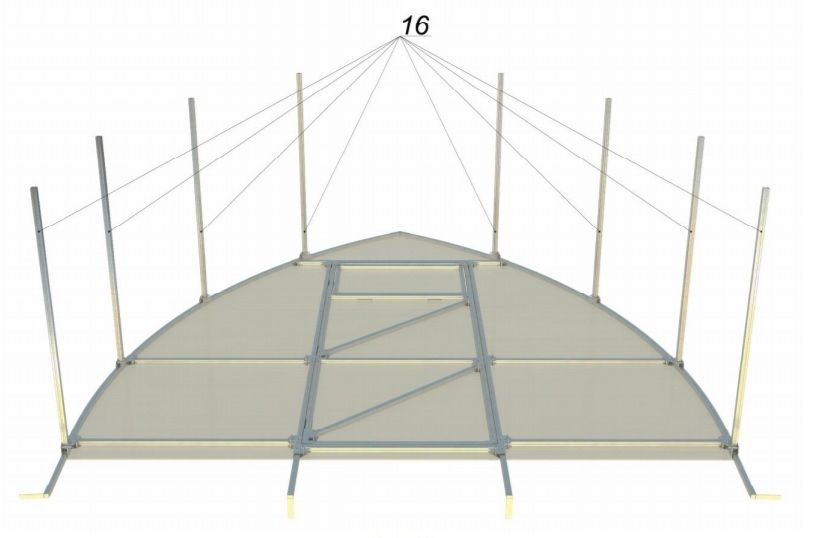
| Next, the frame assembly begins. Eight stringer profiles (16) are mounted to the connecting elements you've already attached to the gable. |
|
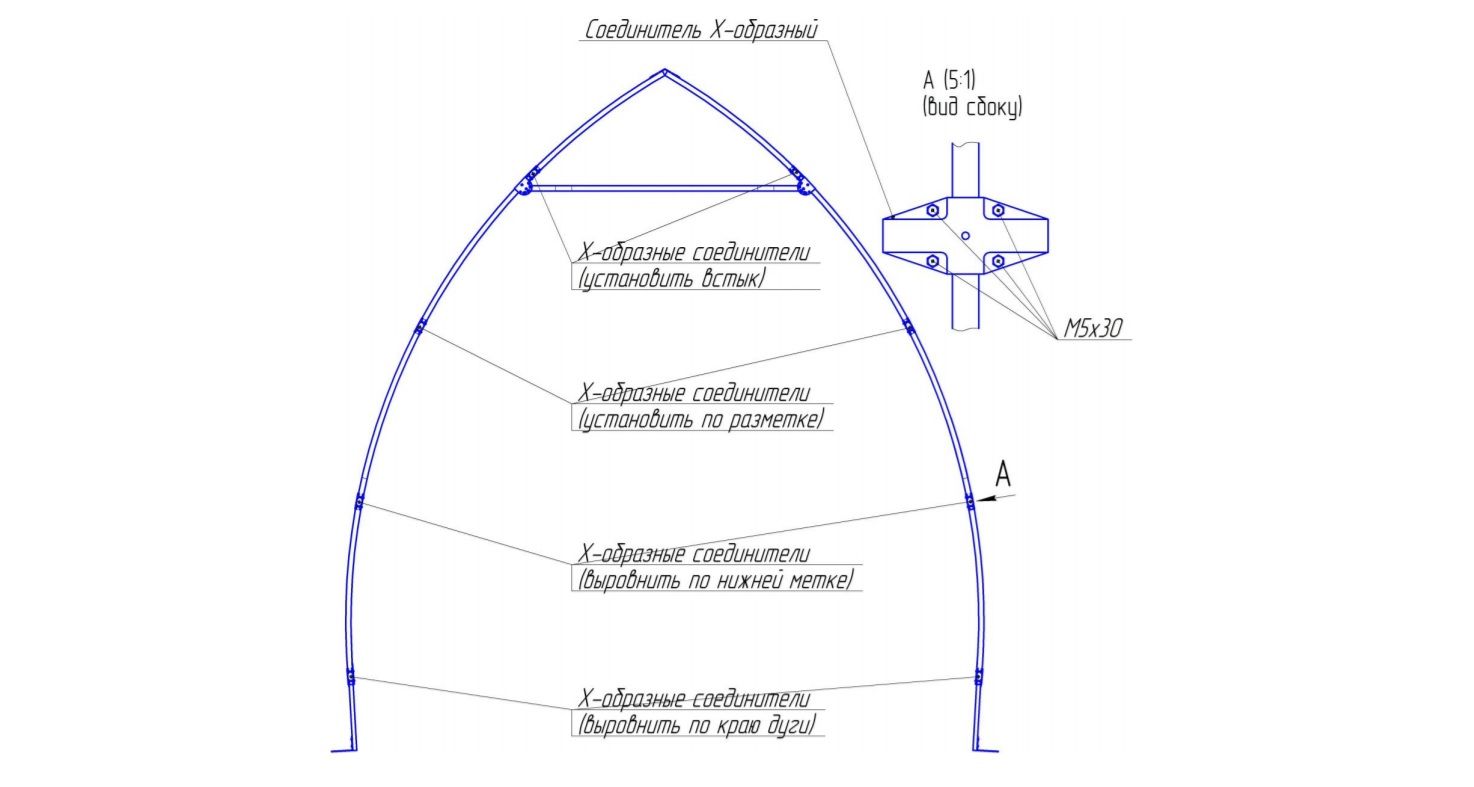
| Once the two main front structures are ready, you can begin assembling the intermediate arches. They are fastened together with brackets and braced with a crossbar. To ensure proper traction, the lugs are also fully installed. For further assembly with the other elements, X-shaped connectors are attached along the entire length of the arches. These should not be tightened too tightly, allowing for easy adjustment to the stinger profiles. |
|
| Intermediate arcs are mounted parallel to each other at the end of the greenhouse. |
|
| Once the frame is almost complete, you can begin installing it on the prepared site. If you're not building a base frame, first mark the site and dig holes for the anchor points (approximately 20 cm wide and 25 cm deep). |
|
| The arches are installed in the holes, compacted thoroughly with soil, and secured together with stringer joints. This continues along the entire length of the structure. |
|
| All frame elements are aligned with the ground and with each other using a building level. |
|
|
Next, cut openings for the door and window. This should be done strictly along the inner contour, otherwise a gap may appear that will compromise the airtightness of the future greenhouse. When working with polycarbonate, it is best to use a well-sharpened construction knife. |
|
|
Particular attention should be paid to cutting out the holes for the hinges; this is a delicate job and requires careful preliminary marking to avoid cutting off too much. Once the door and window are ready, the handle and hinges can be installed. |
|
| The frame is ready, and the front surfaces are covered with polycarbonate. You can begin covering the main area. To do this, measure the finished structure again and cut the polycarbonate sheets. An important step is to allow about 5 cm of polycarbonate sheeting to extend beyond the frame, creating a kind of canopy on the sides of the greenhouse. |
|
| The greenhouse ridge is secured separately. A special bracket (2) is installed on top of it. The key element in securing it is the middle arch. Two tension straps are attached to it on either side: the long one (4) runs the entire length of the arch, connecting to the short one (5) in several places. | |
| Pre-cut polycarbonate sheets are attached to the first three rows of stinger profiles using special self-tapping screws with thermal washers. |
|
| Check the joints for leaks and tighten the bolts. Check the installation quality of the ground anchors. The job is complete. |
|
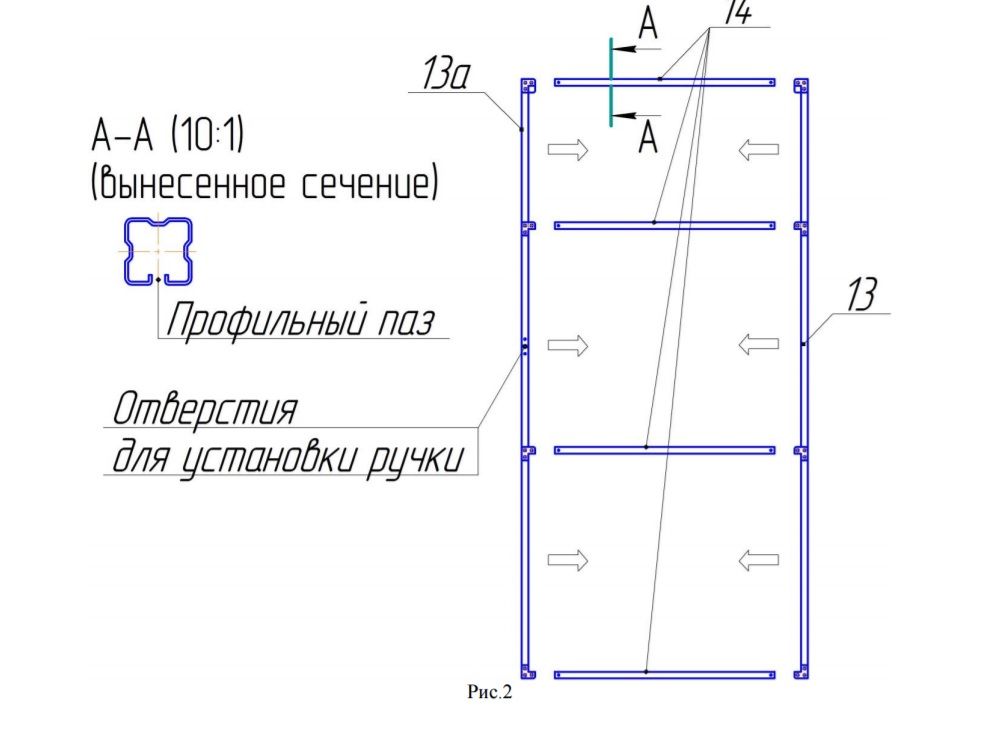
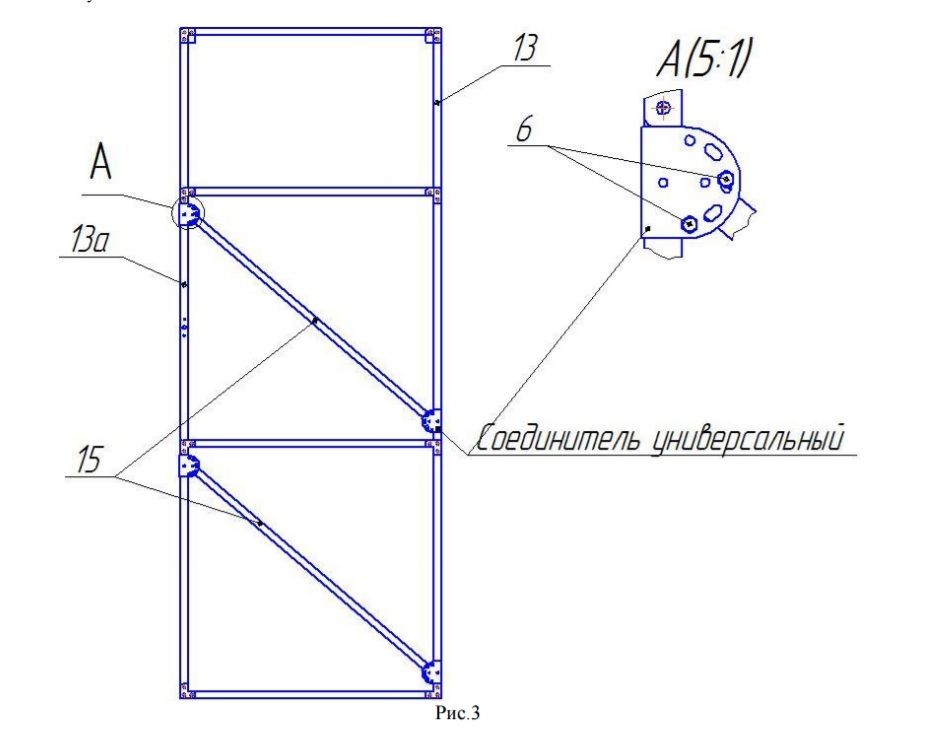

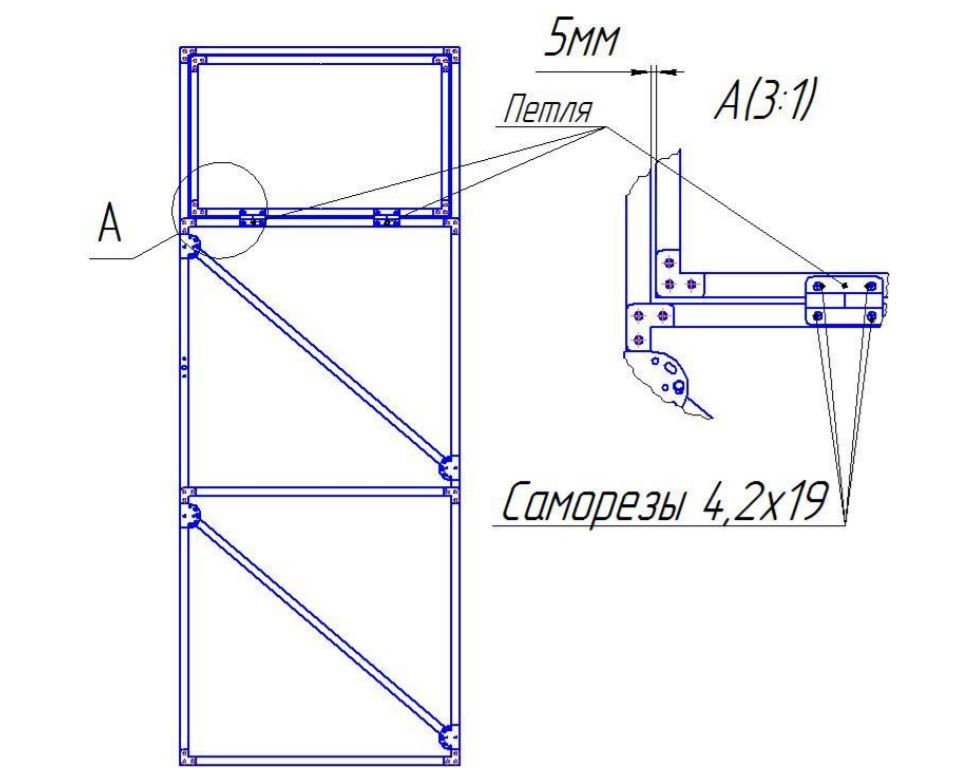
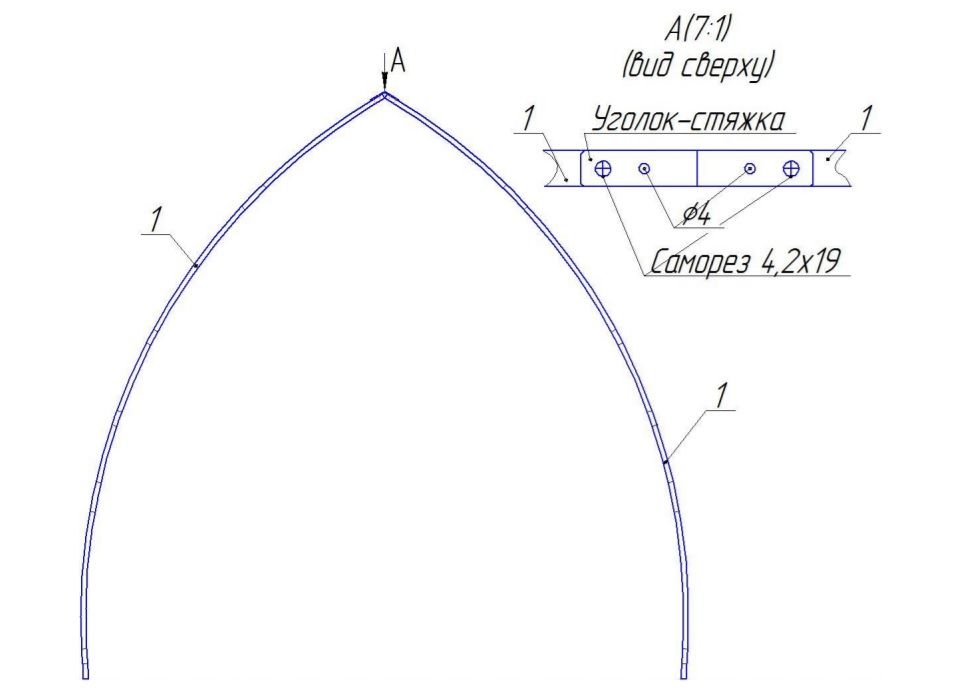
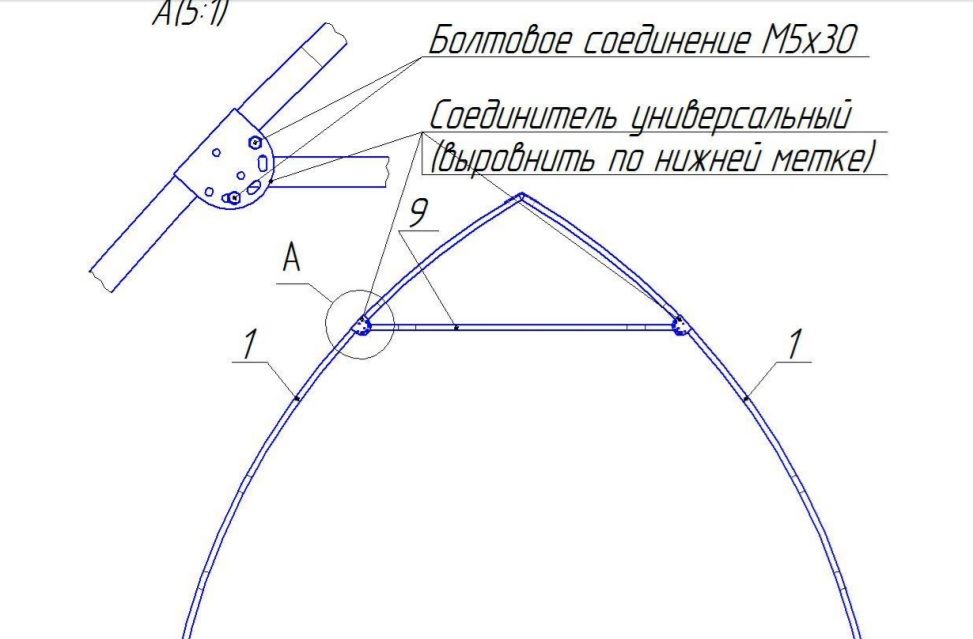
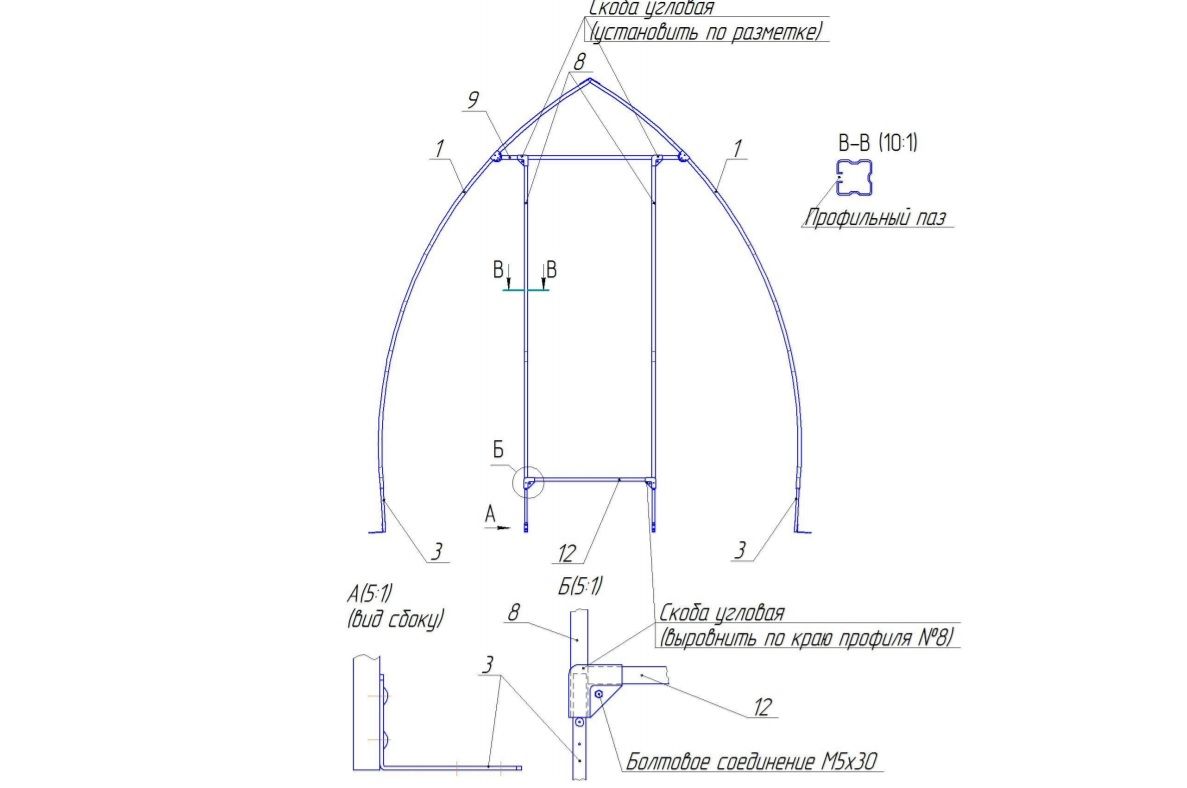
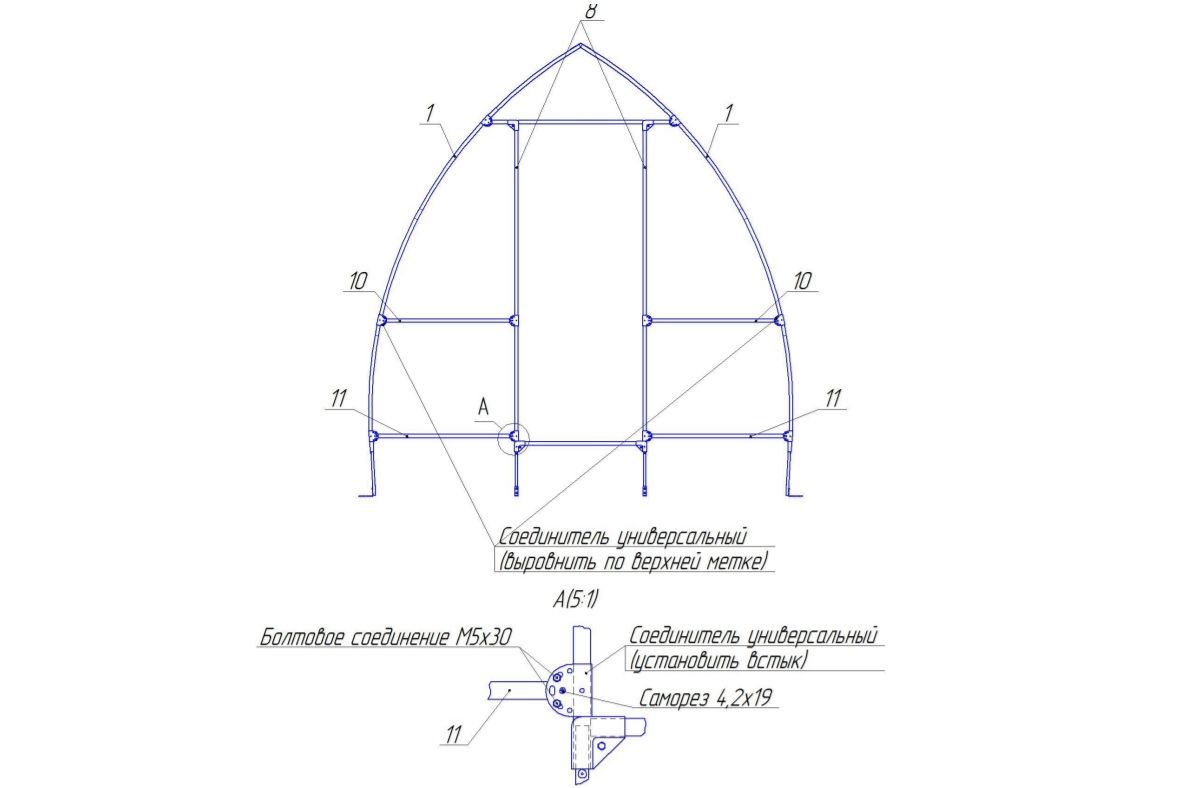
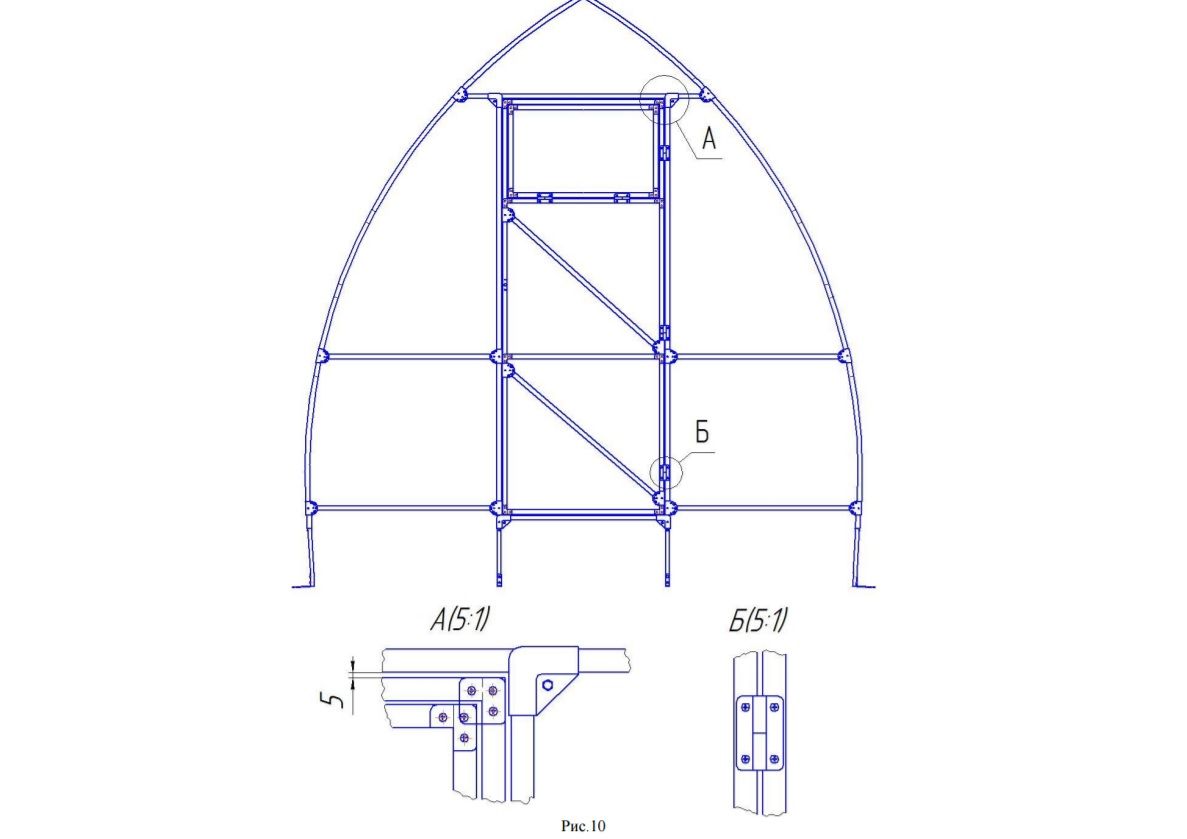
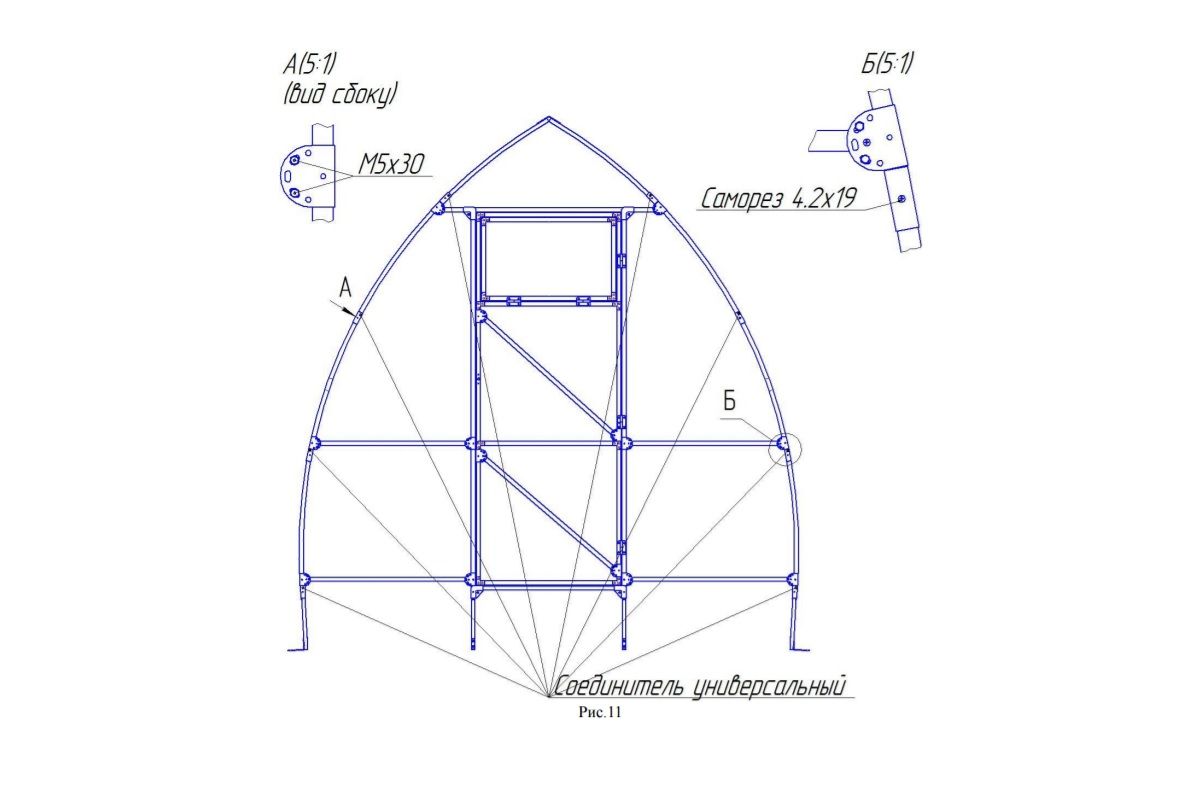
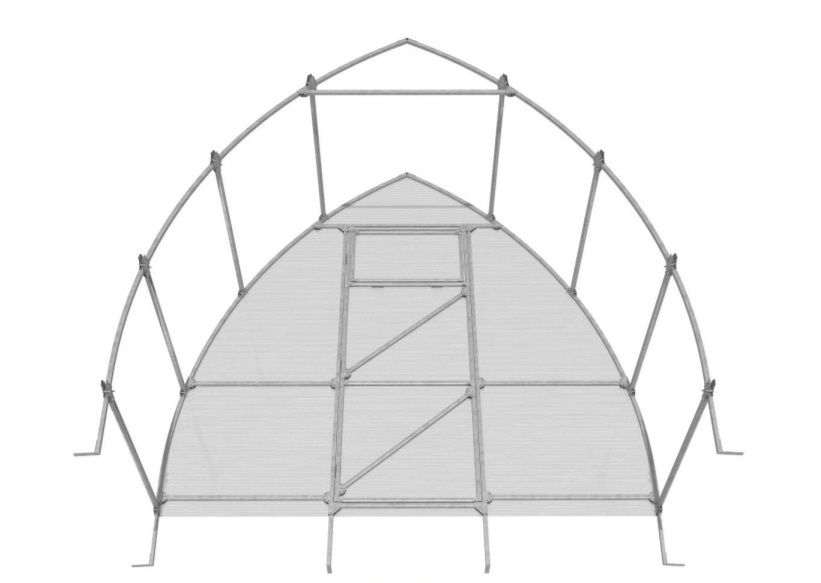
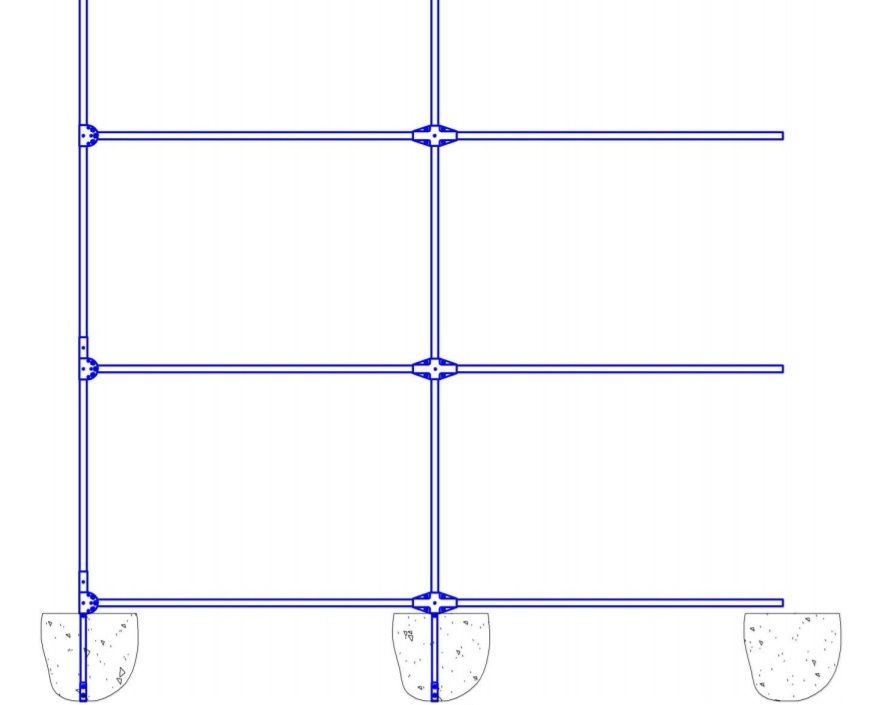
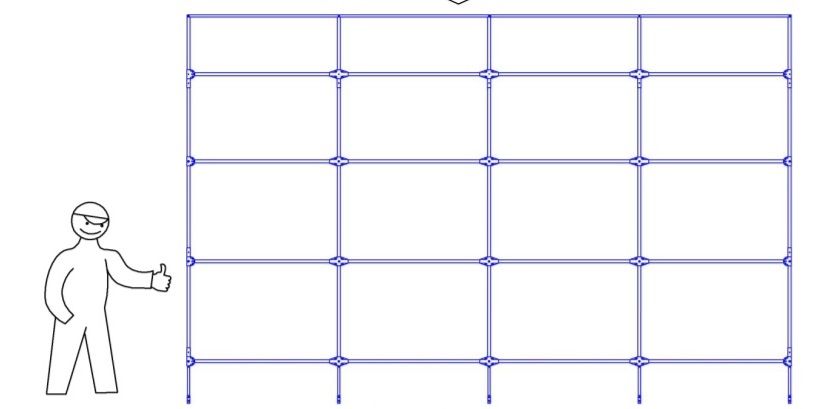
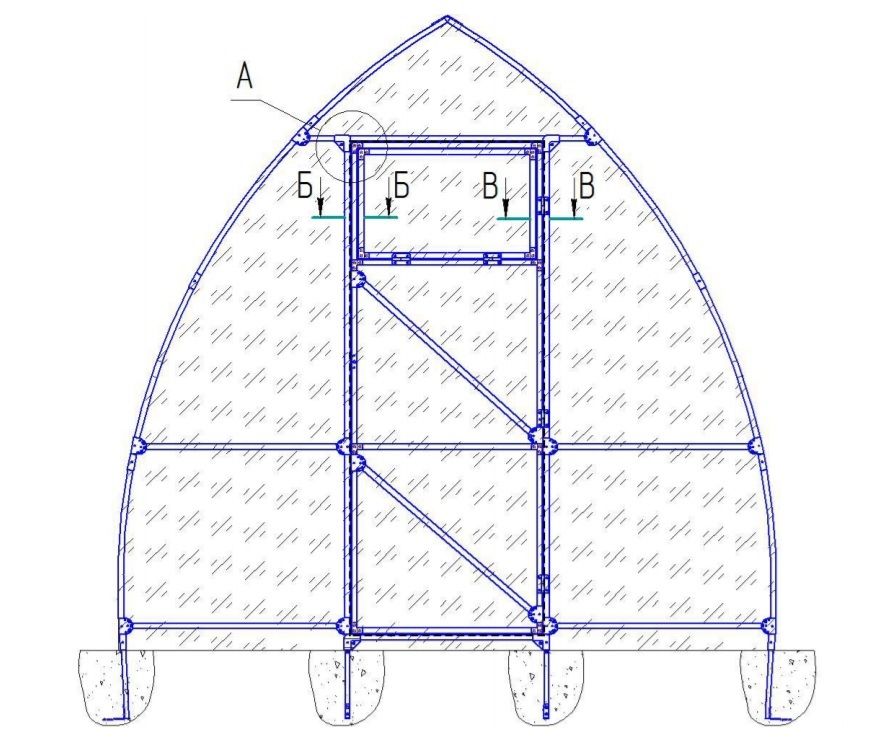
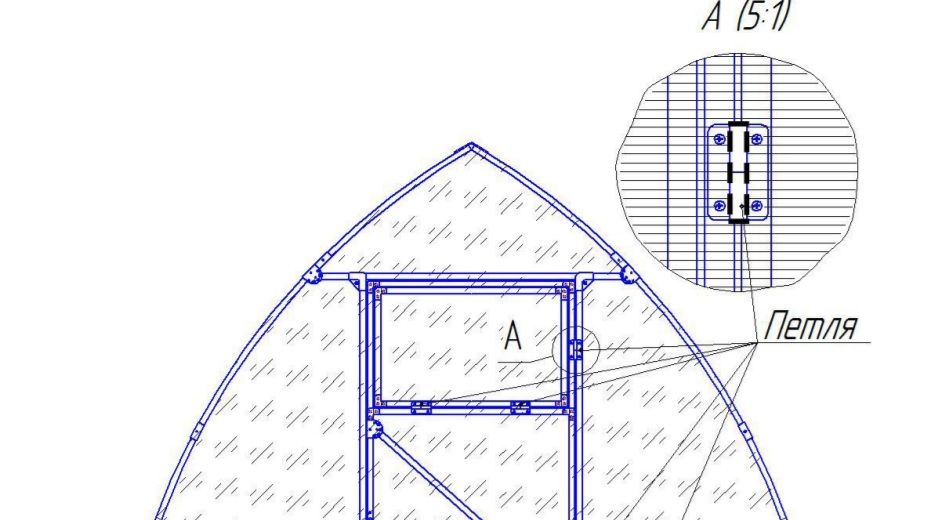
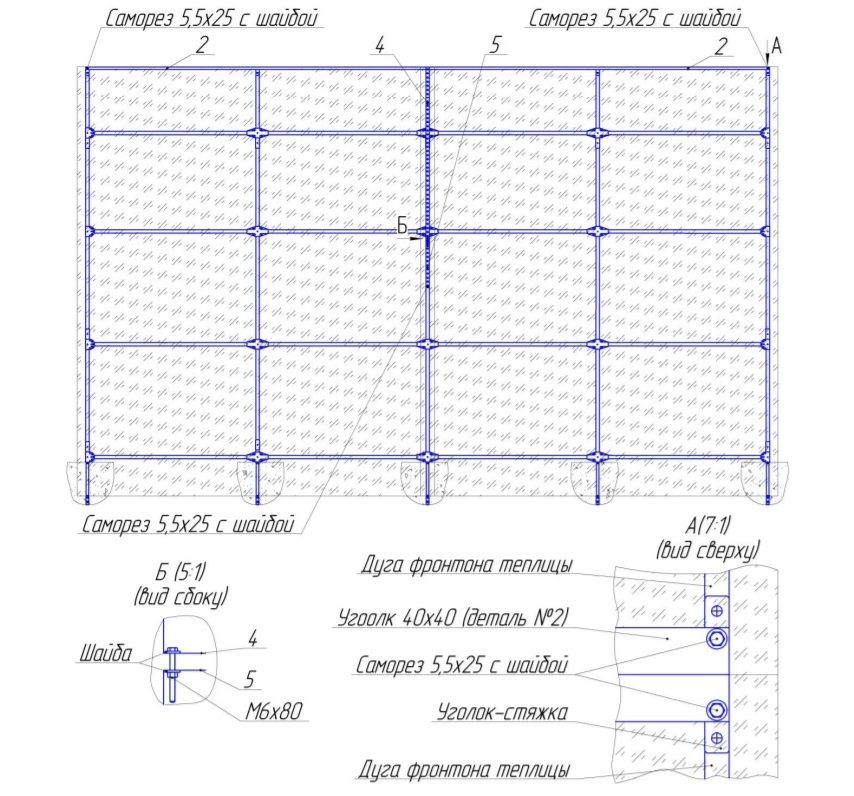
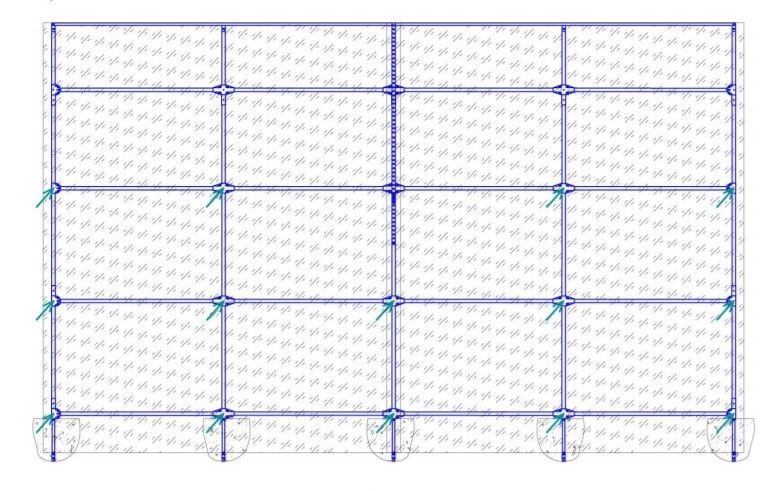
When you purchase a ready-made teardrop greenhouse, you receive detailed assembly instructions. We've provided an example of assembling a classic greenhouse; the installation principles are roughly the same for all manufacturers.
Making a Teardrop Greenhouse: Step-by-Step Instructions
A teardrop greenhouse, as we mentioned above, can be easily purchased at almost any large garden center; many companies produce them. However, if you have metal profiles and a pipe bending tool, you can make one yourself.
This will cost half as much as a ready-made structure with polycarbonate included.
It's best to choose a standard greenhouse height and width of 240 x 300 cm. However, the length can be varied, choosing its dimensions based on the area of the plot.
Step 1. Drawing up a drawing with the dimensions of the structure
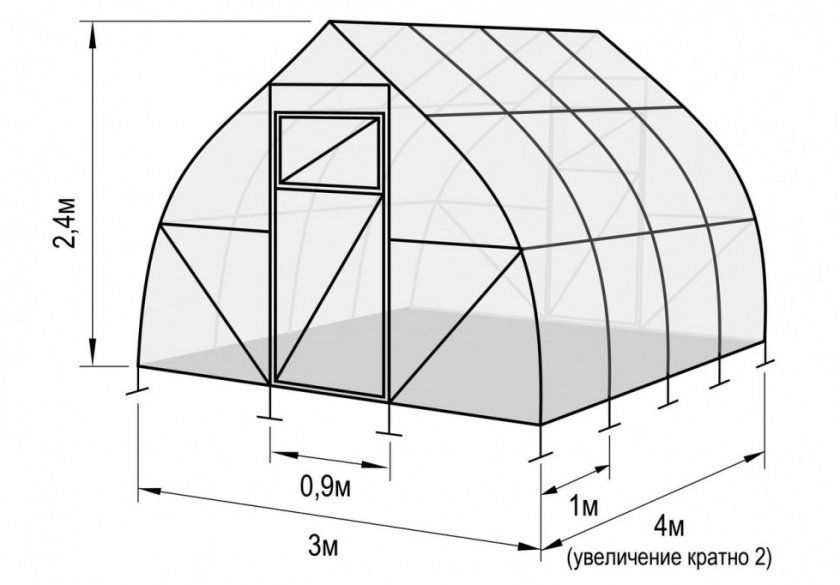
The diagram shows a drawing of the greenhouse with all dimensions. It will require 10 arches and at least 24 crossbars made of profile, with the arches spaced one meter apart. For snowy regions, it is recommended to space the arches closer together. The window and door frame are assembled separately.
Step 2: Choosing a location
Before you begin installing the greenhouse, you need to prepare the site. It should be a well-lit area, and the ground should be leveled if necessary. If the site is prone to quicksand due to groundwater, you'll need to build an additional foundation or a sturdy wooden frame.
Step 3. Building the foundation
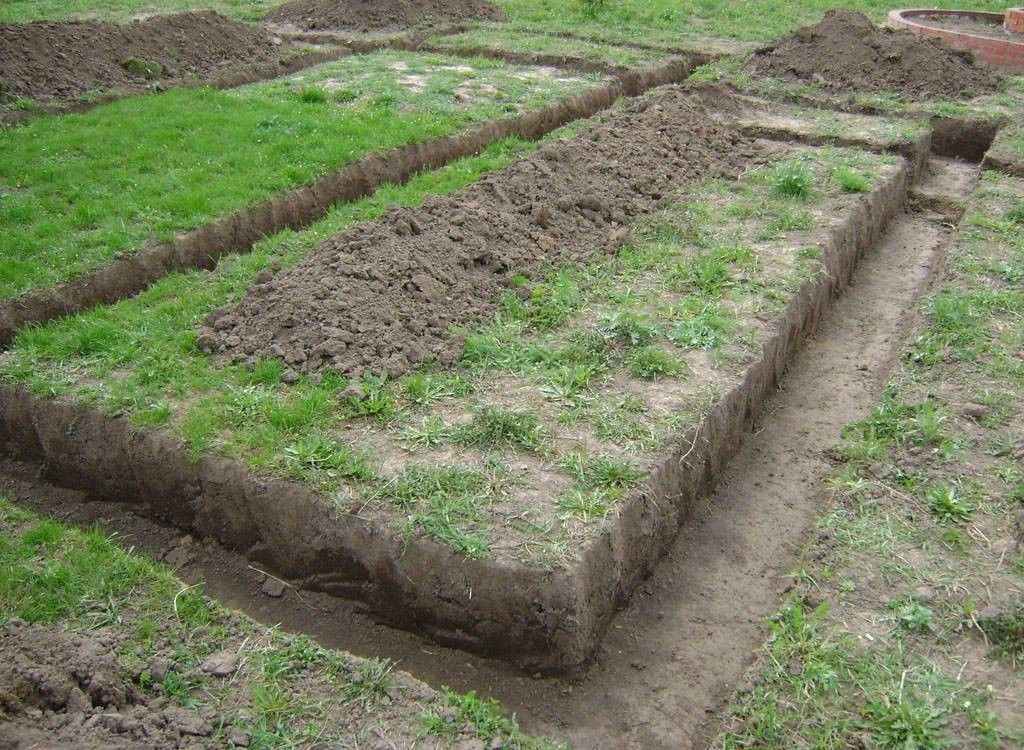
Foundation construction begins with preliminary marking of the greenhouse's location. Stakes are driven into the ground along the perimeter, and string is stretched between them. All soil within the markings undergoes additional preparation: the top layer is removed, and the remaining soil is thoroughly compacted to prevent subsidence and deformation of the structure. For reliability, we recommend a sand and gravel base, especially for areas with groundwater.
Step 4. Making formwork
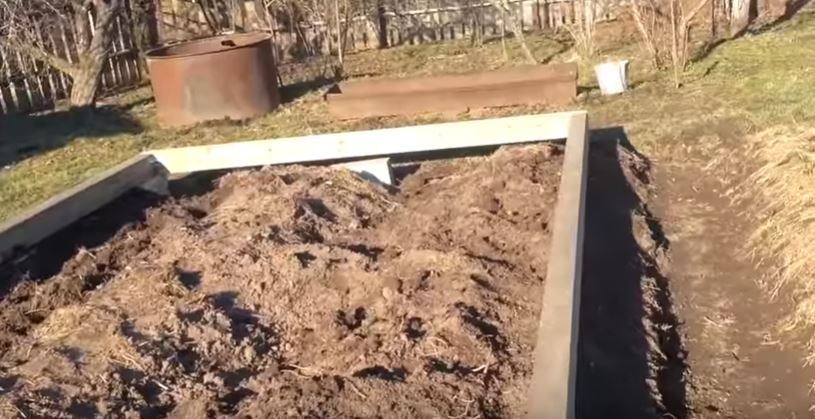
We highly recommend using greenhouse formwork to ensure the structure's stability. It is made from 10x10 mm lumber pre-treated with a special wood mortar. Using galvanized corners and screws, four boards, pre-cut to the size of the greenhouse base, are joined together to form a large frame.
Step 5. Assembling and installing the frame
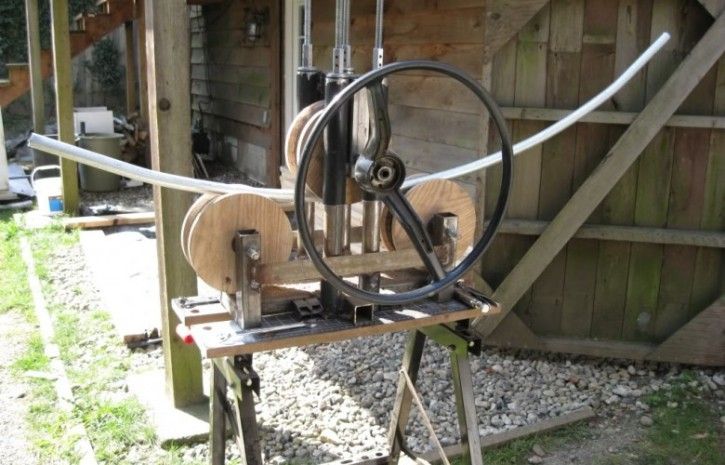
To create the frame, the metal profile must be bent into an arc shape in advance. To do this, use a pipe bender to bend straight metal profiles with an indentation of at least 7 cm at the bottom and 4 cm at the top. This is a challenging task; it takes at least a week for beginners. First, create one arch template, which will be used to bend the remaining elements. The completed arches are fastened together using crossbars, and the front arches are complemented with a window and door. The frame is secured to the formwork with brackets and screws.
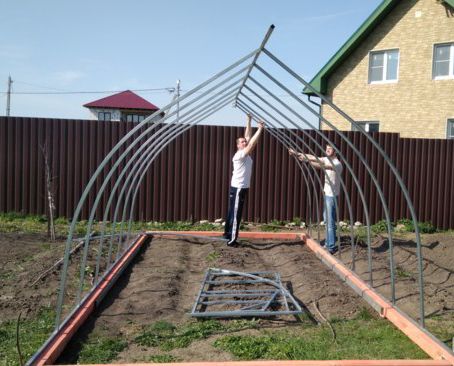
Particular attention should be paid to the structure's ridge. It can be made of 80x80 galvanized steel and should be attached so that it extends slightly beyond the greenhouse's gables.
Determine the distance between the arches yourself; the smaller it is, the more reliable your greenhouse will be.
Step 6. Fastening the polycarbonate
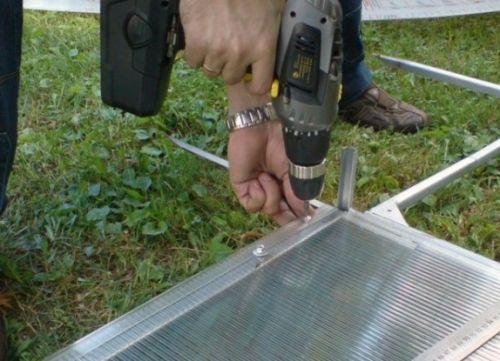
When choosing polycarbonate, it's best to consider options with a rigidity of 35 mm or higher to ensure it survives the winter. You'll need about three sheets, each 6 meters long and 2.1 meters wide. They should be positioned vertically, with the protective film facing out.
To ensure a better adhesion of the polycarbonate to the arches, screws alone are not enough. The sides need to be additionally reinforced; manufacturers suggest applying zinc tape over the polycarbonate. However, some believe that this tape heats up significantly when exposed to sunlight, causing the polycarbonate underneath to deteriorate faster. Therefore, gardeners recommend placing a thermal insulating layer, such as adhesive window seal tape, underneath the zinc tape.
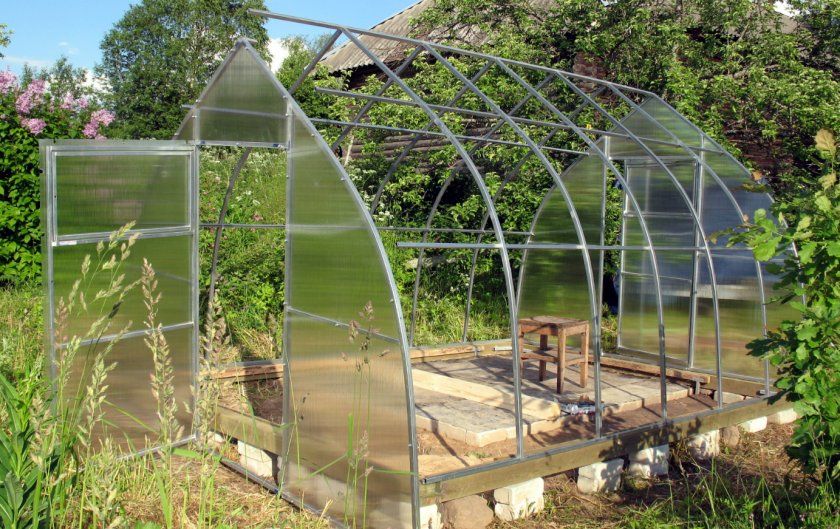
Bending polycarbonate to give it a teardrop shape should only be done across the stiffening ribs to avoid damage and cracking.
The greenhouse is ready. It's not a quick process, but you'll certainly be pleased with the results. A homemade greenhouse will cost much less and last just as long as a store-bought one, provided you follow the operating instructions.
Operating Instructions for a Droplet Greenhouse
If you purchased a ready-made kit, assemble it strictly according to the instructions. Most often, people start reading the instructions after they've got some extra parts. Don't take any chances; carefully read the instructions first, clarifying any unclear points and checking that all the parts are included.
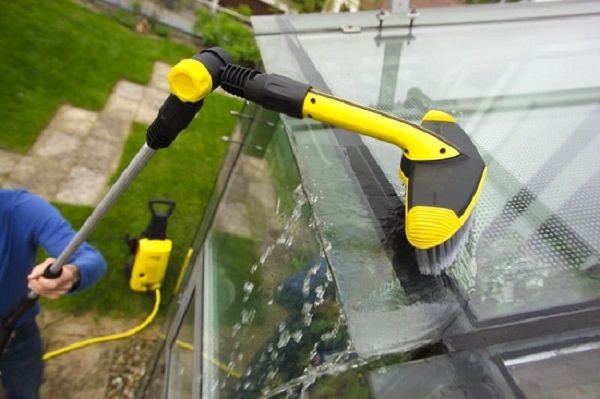
Clean the frame elements regularly. Metal elements should be wiped to prevent water from accumulating during condensation. Polycarbonate should be wiped with a soapy solution.
Do not use abrasive substances to clean it, as they may damage the coating that protects the greenhouse from UV rays.
You cannot use brushes with strong bristles to clean it, as polycarbonate is prone to cracking.
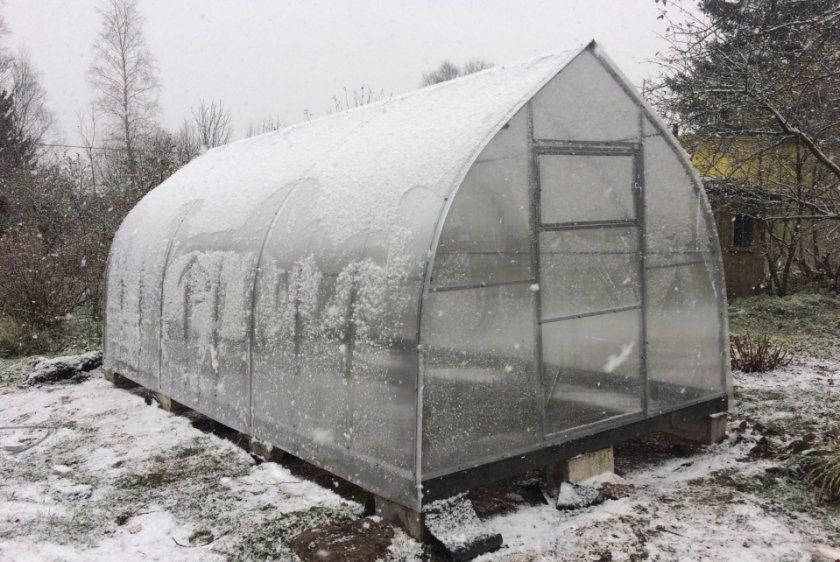
If the winter is too snowy and the distance between the arches is more than 85 cm, then additionally clear the snow from the structure.
At the end of the season, check the fasteners and frame elements for damage and deformation; identifying a problem early will minimize the cost of fixing it.
Customer reviews and recommendations
The vast majority of gardeners who have purchased a teardrop greenhouse rate it "excellent." Everyone notes its reliability; the teardrop shape allows snow to slide freely down the structure and not accumulate on it, which inevitably leads to deformation, as happens with arched greenhouses. Furthermore, even tall people can comfortably sit inside the greenhouse. Gardeners note that the greenhouse's interior perimeter is lined with numerous crossbars for tying plants.
Some gardeners, such as a summer resident with the nickname "serega," believe that a greenhouse can be used year-round by covering it with very thick polycarbonate or replacing it with strong double-glazed windows. However, this requires additional heating from the inside.
Many users, whose reviews can be found online, advocate purchasing a ready-made design rather than making one yourself. This is, of course, more expensive, but you're guaranteed an excellent result.
Among the disadvantages, some note the high cost of a ready-made teardrop greenhouse; delivery costs typically run at least 22,000 rubles or more. Another drawback, often mentioned in gardener reviews, is the appearance of small gaps at the polycarbonate joints, especially where the door and window are attached. After prolonged rainfall, the polycarbonate may slightly separate from the foundation. However, all of these defects are fixable and are also common in other polycarbonate structures.
Customer review
The author has been using the droplet greenhouse for over a year; it was purchased ready-made and disassembled for 32,000.
A gardener named DNV Logoped shares a previous unfortunate experience with a different greenhouse design, which failed to survive the harsh winter and collapsed. He decided to purchase a teardrop greenhouse based on reviews and recommendations from neighbors, as well as the greenhouse description on the manufacturer's website.
The author of this review has been using the greenhouse for several years now and has already come to appreciate it, noting its visible advantages:
- Reinforced construction made of galvanized pipe 20*20, which is not subject to corrosion.
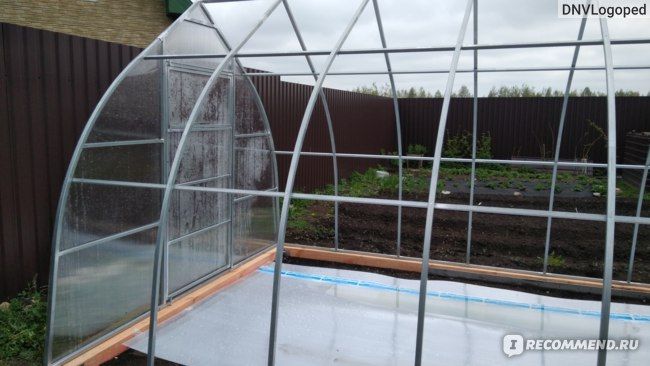
- The polycarbonate sheeting is 4 mm thick and UV-resistant. However, the reviewer notes that one can safely opt for sheets of greater thickness and width, expressing their desire with the phrase, "I wish it were thicker!!!"
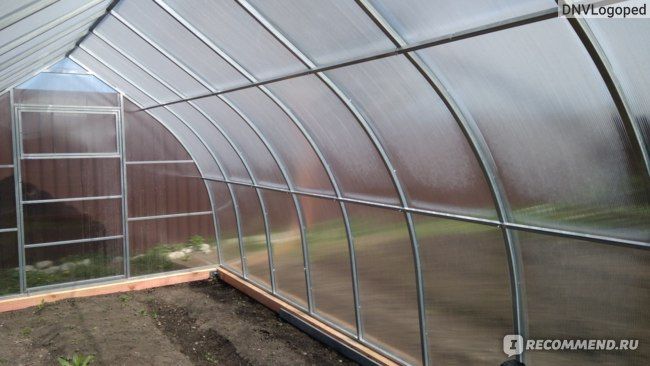
- The door hinges are already welded to the door structure.
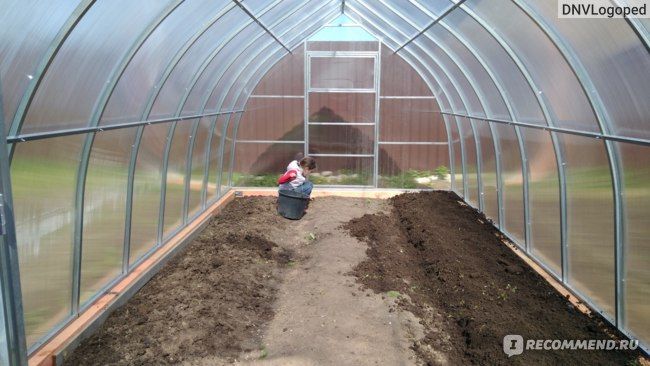
The author notes that the manufacturer also offers the option of purchasing a drip irrigation system or installing a few more vents. We assembled the greenhouse ourselves, using an online video tutorial.
The greenhouse has been in use for over a year, and users have reported no complaints. The teardrop greenhouse, measuring 6 meters long (you can choose the size yourself), 3 meters wide, and 2.5 meters high, easily accommodates three beds.
Choosing a greenhouse: arched or teardrop-shaped
The arched greenhouse variety was long considered the favorite among all other greenhouses available. But over time, its shortcomings became apparent. Many gardeners' greenhouses failed to withstand snow and ice, becoming deformed after the winter.
After numerous similar comments, manufacturers set out to create a more advanced design. This is how the teardrop greenhouse was born. It has fewer joints, saving time and money on additional sealing.
Furthermore, the greenhouse's teardrop shape prevents snow from accumulating on top. This helps reduce the risk of deformation and prevents condensation on the surface of internal structural elements.
If your region is prone to snowfall and wind, and your plantings require staking, a teardrop greenhouse is the ideal solution for your garden.