Dear readers, in this article, you'll learn the rules for growing zinnias from seeds. We'll tell you when to plant them and how to care for the seedlings. We'll cover all the details and offer some tips. First, a few words about the plant.
The garden zinnia, or majora, is an annual plant in the Asteraceae family. Its flat flower resembles a gerbera, but it has several rows of primary petals and a bumpy center. Breeders have created a vibrant palette of zinnias, ranging from yellow to light purple, and numerous shades of red and orange. The plant's stem is dense and sturdy, bearing several buds. These buds open gradually. After flowering, loose capsules form, containing needle-like seeds.
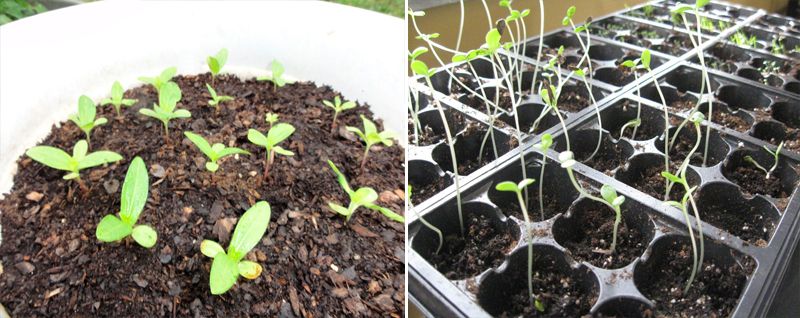
May lilies bloom in midsummer and delight with color until the end of September. This heat-loving flower is wary of frost and dies immediately. In temperate climates, such as Russia, Siberia, and the Urals, zinnias are planted in the ground only as seedlings; the growing season to flowering lasts 2.5 months. Only in warmer regions are seeds sown in flowerbeds. Growing seedlings from seeds is not labor-intensive, but it is a responsible task. To achieve good results, it is important to know the basic rules for caring for flower seedlings.
Growing zinnias from seeds
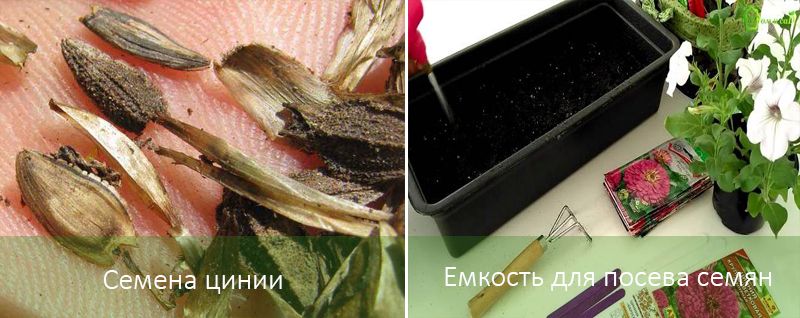
Specialty stores offer a wide selection of planting material. Many gardeners grow their own. Zinnia seeds planted in February ripen fully in the fall. They are collected, dried, and packaged in bags, labeled with the year of collection. Sow the seeds in March or April, depending on the region's climate and the end of the last frost.
There's no point in sowing zinnia seeds too early for seedlings. The plant will stretch out and will be difficult to transplant into open ground. The older the plant, the less well it tolerates transplanting, and its root system will suffer.
There are two methods of planting: with and without pricking out. But first, a few words about seed preparation. Before sowing, they are sorted, discarding any damaged, thin, or broken seeds. Then, the seeds are tested for germination, especially if they have been stored for a long time. The seeds are placed in a damp cloth for two days to swell. Do not allow the seedlings to dry out, as this will cause them to spoil.
Excess water can cause the seed coat to become moldy and diseased. A light misting of the cloth twice a day is sufficient. The needle-shaped seeds should swell, soak, and sprout. Very dry seeds can take up to a week to germinate. Sometimes, the seeds are soaked in liquid for 30 minutes, only then placed on a damp cloth. It's easiest to germinate the seeds in a saucer placed in the sun or near a radiator to warm the seeds. If sprouts still don't appear, discard the tested seeds and start a new batch. Seeds store well for up to two years. After this period, germination rates decline.
Sowing dates according to the 2019 lunar calendar
Zinnias are planted from late March to early April. This timeframe ensures the flowers will continue to bloom for a long time, and the seeds will have time to ripen.
Planting in open ground occurs in May–June. Based on lunar cycles, the best time to sow in 2019 is:
- March – 19-20;
- April – 16-17, 22-23.
A good time to transplant flower seedlings into open ground:
- May – 9-10, 15-16;
- June – 9-12.
The days of new moons and full moons are considered unfavorable for planting and picking plants:
- March – 5-7, 21-22;
- April – 4-6, 18-21.
- May – 4-6, 19-20
- June – 2-4, 16-17.
The exact date for planting seeds or seedlings outdoors should be determined based on soil conditions; they should warm to 8°C. If the temperature is lower, the plant will become ill and may even die. Zinnias are sensitive to large temperature fluctuations, so this should also be taken into account. Any frost will be fatal.
The sowing time for seeds is determined by simple calculations. The growing season—the complete plant growth phase from germination to seed ripening—takes approximately 10 weeks, or two and a half months. Seedlings are planted in the ground at four to six weeks of age. By this time, the frost period should be over, and nighttime temperatures should not drop below freezing.
Sowing zinnia seeds at home
The flower prefers loose, nutritious soil. For planting, purchase a ready-made all-purpose soil mix or tomato soil. Many people make their own mixture from 2 parts humus, 1 part turf soil, and ½ part river sand. It's best to steam the soil in a water bath or bake it in the oven at up to 100°C. A similar disinfectant effect can be achieved by pouring boiling water over the soil. You can also prepare a pink solution of potassium permanganate. No additional fertilizer is needed in a fertile soil mix. Zinnias dislike excess nitrogen in the soil, as it promotes root rot.
Seeds are planted without transplanting into small peat cups, joined together to form a block. They are filled with soil, leaving a 1 cm gap to the top. The soil is lightly pressed down, and a small hole is made in the center for the seed. To ensure poor germination, many people place two needle-shaped seeds in each cup.
Peat pellets are a convenient way to sow seeds. For zinnias, the optimal diameter is 4 mm. The pellets, while still in a protective mesh, are immersed in warm water for an hour. Afterward, they are placed on a raised stand. Two to three seeds are planted in each pellet. After germination, the strongest shoot is left. These containers are convenient for transplanting seedlings into open ground.
The traditional method of sowing is done in a large planting container. To do this, make furrows 5 mm deep. Place the seeds 2 cm apart, water the soil thoroughly, and cover with dry soil. Cover the planting container with plastic wrap to create a tropical climate, and store it in a warm place for 4-7 days. The plants do not require light or water at this time.
Place the seedlings in a bright spot, and remove the plastic wrap. The recommended temperature for germination is 22 to 24°C. Transplant the seedlings into individual planting containers after three full-sized leaves have emerged. Paper cups made from rolled-up old newspapers, placed in plastic crates, and filled with soil are convenient.
Sowing seeds in a greenhouse
When climate and greenhouse conditions permit, there's no point in growing seedlings indoors. Zinnia seeds are sown in a greenhouse. The main advantages of greenhouse seedling cultivation are good lighting and acclimatization of the plants. During periods of frost, the shoots are protected with a white, non-woven covering. This allows the ultraviolet light needed by the plants to pass through.
Zinnias are planted in individual containers or boxes. It's not recommended to sow seeds directly into the ground. Firstly, the soil may harbor pests, requiring treatment. Secondly, soil previously occupied by tomatoes and eggplants is unsuitable for zinnias, as these plants are susceptible to similar diseases. Thirdly, flower seedlings won't interfere with spring preparation of the greenhouse for planting heat-loving crops.
Caring for seedlings
Plants are usually placed on windowsills. They require a well-lit, warm spot. They thrive in any direction except north, where they don't get enough light. Without enough ultraviolet light, seedlings begin to stretch, and stems become thin and unstable. Increased daylight hours are necessary. Pinching the shoot can help save it: remove the top portion with disinfected scissors or by hand. Pruning is also performed on mature plants if side shoots are desired. After pinching, the stem begins to branch, with side shoots emerging from the leaf axils.
Seedlings respond well to foliar feeding (see below for details) and water sprays. Showers are given in the evening to prevent sunburn from burning the leaves – water droplets act like a lens. It's advisable to loosen the soil once a week. Use wooden skewers or toothpicks for this. Loosen the top layer of soil to a depth of no more than 1 cm to avoid damaging the roots.
Three weeks before planting outdoors, harden off the seedlings. They are brought out onto the balcony or terrace when the temperature reaches 12°C. Start with 20 minutes, gradually increasing the interval. Hardened seedlings will have thicker stems, stop stretching, and establish themselves more quickly after transplanting.
Features of watering seedlings and lighting
Zinnias don't like stagnant water; they require moderate watering, no more than twice a week. On cool days, it's best to replace watering with a soil mist. To prevent root rot, treat the soil with a pink solution of potassium permanganate every three weeks. For watering, use settled tap water or melted snow. Fill a watering can with a narrow nozzle and pour it right at the roots.
Any light source will do for illumination; it's enough to leave it on for a long time. Fluorescent or LED lamps can be placed close to the plant; they generate less heat. A minimum distance of 60 cm is recommended. It's recommended to increase the daylight hours to 14 hours. This will ensure the plant develops fully.
Feeding seedlings
During the growing season, seedlings only need to be fed twice. The first time after 2–2.5 weeks, and the second time two weeks before planting outdoors. Avoid applying too much fertilizer. Plants in the Asteraceae family don't like excess organic matter or nitrogen, as they can become diseased. Potassium is essential for the plant, which is found in manganese and ash. Phosphorus is provided by adding superphosphate. The best option is to use ready-made mineral mixtures for ficus and citrus. Prepare the solution according to the instructions.
The biostimulant "Zavyaz" is ideal for foliar feeding; it contains amino acids and stimulates lush flowering. You can replace scheduled soil feeding with foliar feeding by spraying the plant with a solution of complex fertilizers, but double the amount of water. This type of feeding should be done early in the morning, before the sun gets too hot, or when the plant is in the shade. Avoid leaving wet leaves exposed to sunlight.
If the plant is growing in a peat tablet, increase the potassium fertilizer dose. To do this, dissolve a tablespoon of wood ash in a liter of water. Let the solution sit for a week, then dilute it 1:1 with water and use the prepared solution for watering. Ash is also beneficial because it neutralizes the acidity of the peat mixture.
Picking seedlings
Before final planting, allow the seedlings to acclimatize to the new conditions. If it was not possible to harden them off at home, bring them to a greenhouse or hotbed two weeks before planting and cover them overnight to prevent freezing. On warm days, take them outside and then leave them overnight near the flowerbed, first under cover, then without it. This adaptation promotes rooting of the shoots.
A powerful root system will develop that will withstand the new conditions. Before planting, the root ball should be allowed to dry out, and the plant should not be watered. This is done to compact the soil around the roots.
The repotting method depends on the container the plant was grown in. The simplest option is to plant zinnias in peat pellets. Simply remove the reinforcing mesh and transfer the plant to the soil, ensuring there's a 1-cm layer of soil above the pellet. Peat and paper cups are removed without damaging the root ball; they are cut lengthwise. Plants should not be planted in paper or peat pots, as this will make it difficult for the roots to escape. The most difficult option is to grow the plants in a single pot. The soil is thoroughly soaked and mashed to allow the plants to be removed without damage.
When the seedlings are ready for planting, they simply need to be placed in a pre-prepared hole or trench, depending on the flowerbed layout.
Zinnias look beautiful both individually and in groups. Choose a sunny, wind-protected site for planting. Acidic soils should be deacidified beforehand by watering with a solution of ash and chalk. Zinnias grow spreadingly, with a minimum distance of 35 cm between plants.