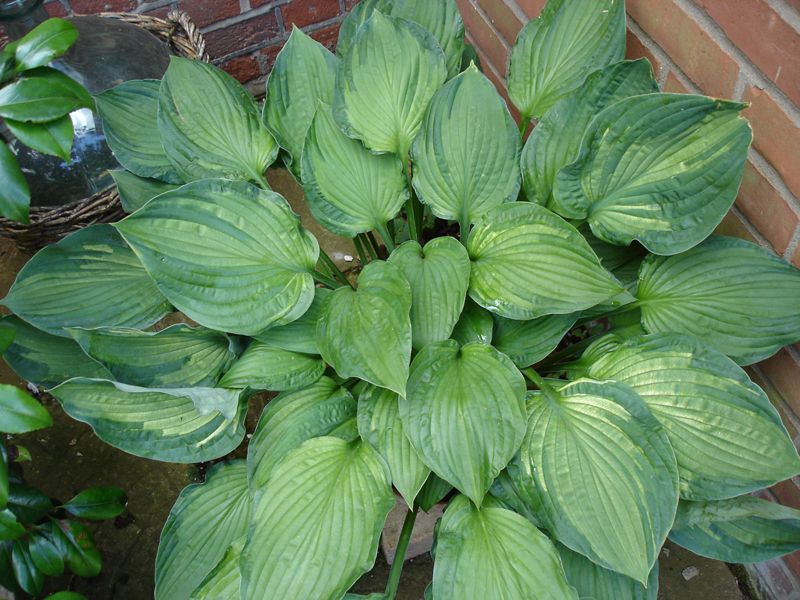
Hosta (Funkia) is a perennial flower belonging to the Asparagus family, formerly classified as a Liliaceae. It is native to the eastern regions of Asia.
Content
Description
The plant received its first name thanks to the Austrian doctor and botanist Nikolaus Hosta, and the second – to the German scientist Christian Funk.
The rhizome is compact and short-branched. The foliage varies in shape, from narrow lanceolate to broad ovate. The peduncles reach up to 1 m in height. The inflorescences are racemose. The buds range in color from white to lilac.
The fruits are produced in a triangular, leathery capsule. The seeds are black and flat.
Hostas are perennial flowers, species
There are about 40 varieties of hostas, but only a few are suitable for home growing:
| View | Height, cm | Leaves |
| Swollen | 50 | Pointed at the tips. |
| Wavy | 75 | They have wavy edges, the central part is white, the edging is green. |
| High | 90-100 | Large, glossy shine. Darkish color. |
| Siebold | 60 | Medium size, deep veins. |
| Curly | 50-60 | Wide. Color: grassy, white at the edges. |
| Plantain | 50 | Shiny, bright green. |
| Fortune | 50 | The colors are rich green, the edging is cream. |
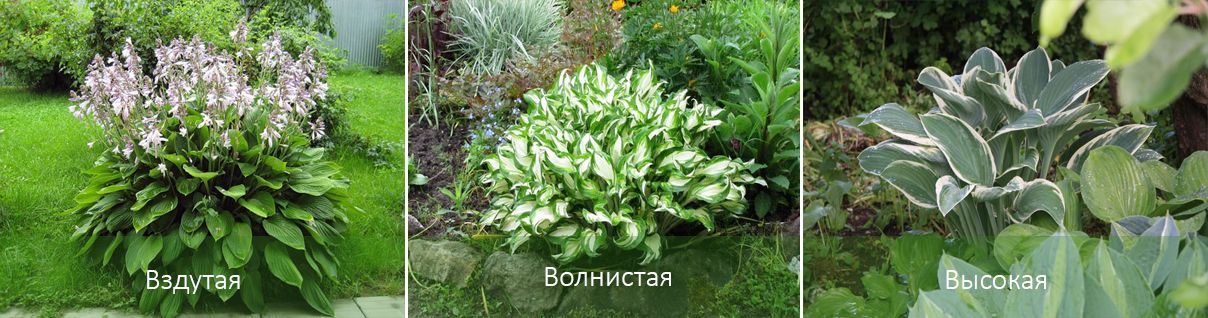
Variety of colors
Based on the color of the foliage, hostas are divided into 5 classes:
- Blue;
- Yellow;
- Green;
- Variegata – varieties with multi-colored foliage, with a light border along the edge;
- Mediovariegata - light, border - greenish.
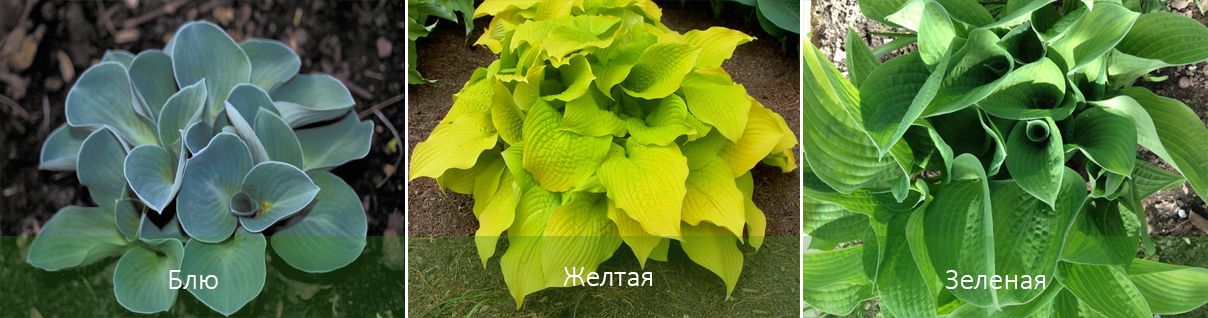
Variety in size
Taking into account the size of the plant, it is divided into 6 categories:
- dwarf – less than 10 cm (Draft);
- miniature – from 10 to 15 cm (La Donna);
- small – 16-25 cm (Gold tone);
- medium – from 30 cm to 0.5 m (So Sweet and White Feather, the latter variety with white foliage that turns green as it grows);
- large – 55-70 cm (Golden Meadows and Alvatine Taylor);
- giant – more than 0.7 m (Blue Vision).
Growing hosta from seeds at home
Growing flowers from seeds at home is complicated by the fact that their germination rate is only 70-80%. Therefore, the planting material is pre-treated with growth-promoting agents (by placing it in solutions of Zircon, Kornevin, or Elin for half an hour). Stratification is also practiced (by placing it in the refrigerator for a month).
It's recommended to purchase potting soil from gardening stores, as the microorganisms present in regular soil can negatively impact seedlings and even cause their death. The soil is a mixture of perlite and peat in equal proportions.
In March, prepare the seedling containers, wiping them with alcohol or a weak solution of potassium permanganate. Place a drainage layer of pebbles on the bottom, add soil, and moisten. Leave the plants in this condition for a few days, then sow the hostas, scattering the seeds evenly across the soil surface.
Sprinkle the same substrate used previously on top, about 5-7 mm thick. Cover the container with plastic or glass to retain moisture. Ensure the soil temperature remains between 18 and 25°C during germination.
If you follow the technology, the first shoots will appear within a few weeks. Direct sunlight, excessive moisture, and condensation on the cover are dangerous for the plant. Seedlings should be kept in a slightly shaded area.
When 2-3 true leaves appear, the plant is pricked out. The hostas are transferred to individual pots filled 25% with sand. The pots are placed in a tray of water to ensure bottom watering.
The next step is hardening. Remove the plastic wrap and move the flowers outside. This process is performed at temperatures above 18°C.
Growing hostas outdoors
Hostas are planted outdoors in late August or early fall. Two weeks before planting, spread rotted pine bark or manure, leaf mold, and compost over the selected area. The layer should be about 10 cm thick. Dig the soil with organic matter to a depth of about a spade. Use 1.5-2 buckets of the solution per square meter.
Water the soil thoroughly 30 minutes before planting. Small and medium-sized plants are spaced 20-30 cm apart, while larger plants are spaced 30-40 cm apart. The root system grows horizontally, so the wider the hole, the better the decorative effect. It responds well to mulching, with a minimum layer of 5 cm.
Planting time
The best time is late spring, as the roots are growing but the leaves haven't yet emerged. The latest deadline is early September. In the South, they can be planted in October. If planted later, the shrubs won't take root.
If you want to know the actual dates by region and the Lunar calendar, go to article.
Selection of healthy seedlings for planting
The healthiest seedlings are selected for planting and subsequent care. They are inspected for rot and other diseases. Strong specimens are chosen.
Landing site
A hosta's location is chosen for years to come, as the plant can grow for 20 years without replanting. The ideal location is partial shade and free from drafts, but professionals adhere to the rule that the more colorful the foliage, the more sun-loving the plant is.
Bright representatives of the species are selected for places where there is partial shade at midday and sun the rest of the time.
Soil characteristics
Select nutritious and well-drained soil. Cultivated loam is ideal. The pH should be 6.5-7.5. Never use uncultivated clay soils or dry sandstone.
Hosta responds positively to the presence of organic matter in the soil, so in addition to timely application of fertilizers, the plant is regularly mulched with compost.
Stages of hosta planting
The spacing between holes depends on the type of plant being planted in the soil:
- small and medium – 30-50 cm;
- giants – 0.8-1 m.
To ensure successful planting, water the potted seedlings beforehand. Transfer them to the holes along with the root ball. Sprinkle the soil on top and compact it so that the soil level is 2-3 cm below the rest of the soil.
If planting is done by dividing the bush, then dry leaves and damaged rhizomes are removed from each part.
Caring for hostas
When growing and caring for hostas, a number of rules must be followed.
Watering
Water generously and frequently (twice a week). Water in the morning. Keep the soil moist, but avoid stagnant water, as this can lead to fungal infections.
Fertilizing
Fertilize three times during the growing season. The first application is at the very beginning of growth. The second is after flowers have formed. The third is after the buds have fallen.
A combination of complex fertilizers and compost is recommended. Mulch the soil immediately after fertilizing.
Hosta propagation
The plant is propagated by cuttings and dividing the bush.
cuttings
Cuttings can be taken anytime from spring to fall. A section containing a bud and a small amount of rhizome is separated from the mother plant. The resulting material is placed in the shade and covered with a pre-cut bottle. Over time, the missing parts will grow back and normal foliage will develop.
Dividing the bush
This is done in the spring, after the seedlings emerge. The mother plant is carefully removed from the soil, large clods of soil are removed, and rotted areas are trimmed away. The plant is cut with a knife or a sharp shovel. Each section should have a bud and a piece of rhizome.
The cuttings are transferred to the soil and watered constantly for the first few weeks.
Pests, diseases
During hosta growth, it is susceptible to various diseases, and gardeners constantly observe insect attacks:
| Pest/disease | Symptom (effect on foliage) | Methods of elimination |
| Phyllostyosis | Red-brown spot. | All diseased leaves are cut off and discarded. Shrubs are sprayed with Vectra or Abiga-Peak, and colloidal sulfur is often used. |
| Botrytis | Rotting. | Treat with Bordeaux mixture or Topaz. Destroy affected parts. |
| Root collar rot | The rhizome is affected. | They dig up the plant, rinse the root system, remove any infected areas, and soak it in a light solution of potassium permanganate. They transport it to a new location. |
| Slugs | Traces of dried mucus, holes. | Place the Thunderstorm bait under the flower, cover it with plywood in the evening, and collect the pests manually in the morning. |
| Foliar nematodes | Light brown spots. | Affected areas are destroyed. The soil is sprayed with a formalin solution, or the plant is moved to a new location, but first the roots are soaked in potassium permanganate. |
If diseases and insects are detected in a timely manner, the flower will delight you with its blooms for a long time.
Top.tomathouse.com recommends: Hosta in landscape design
The plant is widely used in landscaping due to its decorative qualities and shade tolerance. Large specimens are used as single plants, while specimens less than 10 cm in size adorn rock gardens or borders. Medium-sized flowers blend harmoniously into various garden arrangements.
Hostas highlight the originality of flowerbeds and borders. Against the backdrop of modern-style paths or groundcovers, the flowers fully showcase their decorative qualities.
They are grown next to low coniferous perennials, ferns, daylilies and a whole range of other flowering deciduous-ornamental flora varieties.